How to create Whatsapp message templates?

Written by Medha Anand
Updated on April 4th, 2022
- Getting Started
- Bot Building
- Smart Agent Chat
- Conversation Design
-
Developer Guides
Code Step Integration Static Step Integration Shopify Integration SETU Integration Exotel Integration CIBIL integration Freshdesk KMS Integration PayU Integration Zendesk Guide Integration Twilio Integration Razorpay Integration LeadSquared Integration USU(Unymira) Integration Helo(VivaConnect) Integration Salesforce KMS Integration Stripe Integration PayPal Integration CleverTap Integration Fynd Integration HubSpot Integration Magento Integration WooCommerce Integration Microsoft Dynamics 365 Integration
- Deployment
- External Agent Tool Setup
- Analytics & Reporting
- Notifications
- Commerce Plus
- Troubleshooting Guides
- Release Notes
To create Whatsapp message templates, you first need to get access to the Facebook Business Manager Tool of the business. If you don't already have access, you can speak to your Haptik SPOC and they would guide you to get access. Once you have access, you can go to the Message Templates section of the Business Manager tool and create your message template.
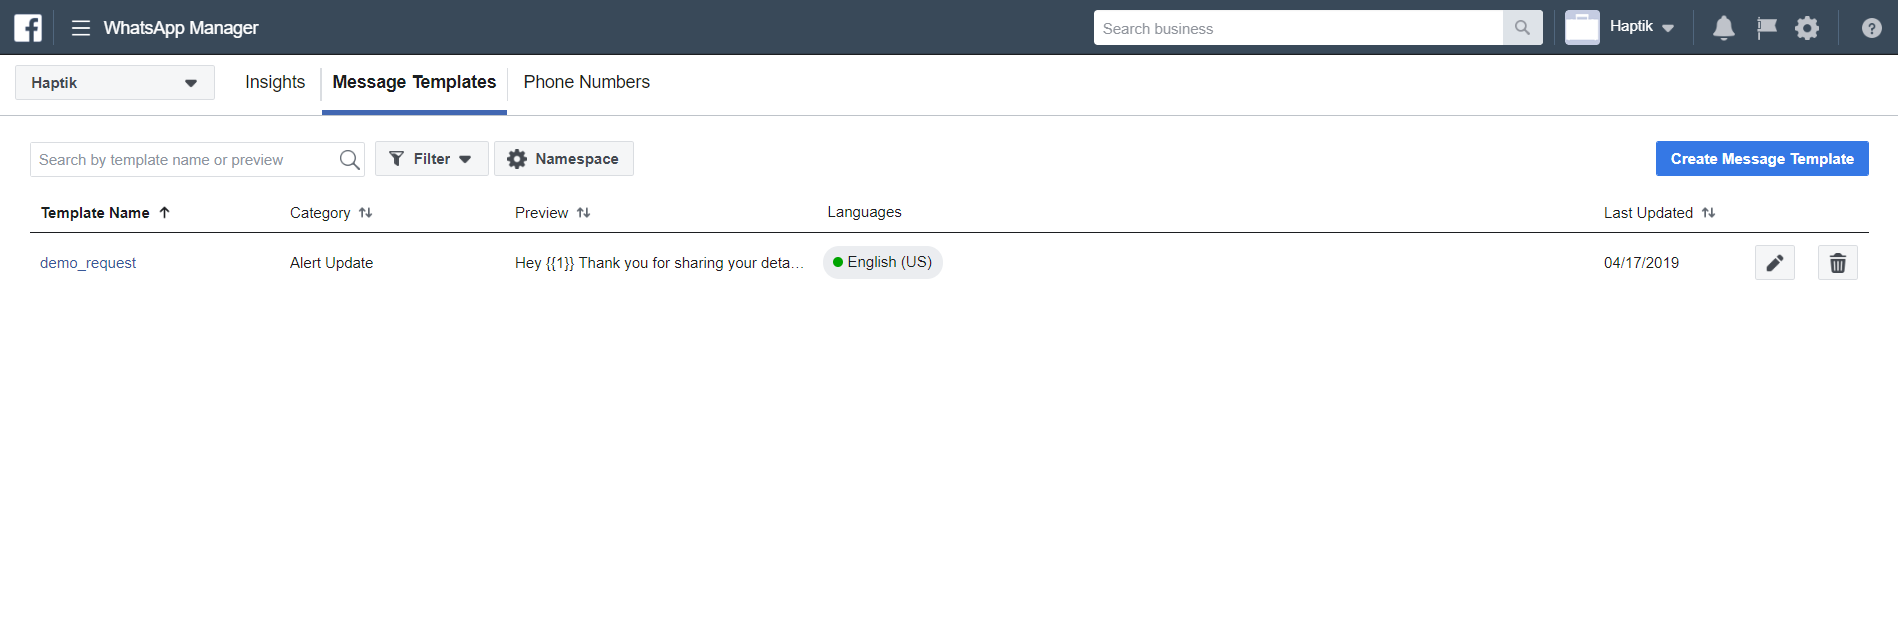 On the Message Templates page click on the Create Message Template button to create a new template.
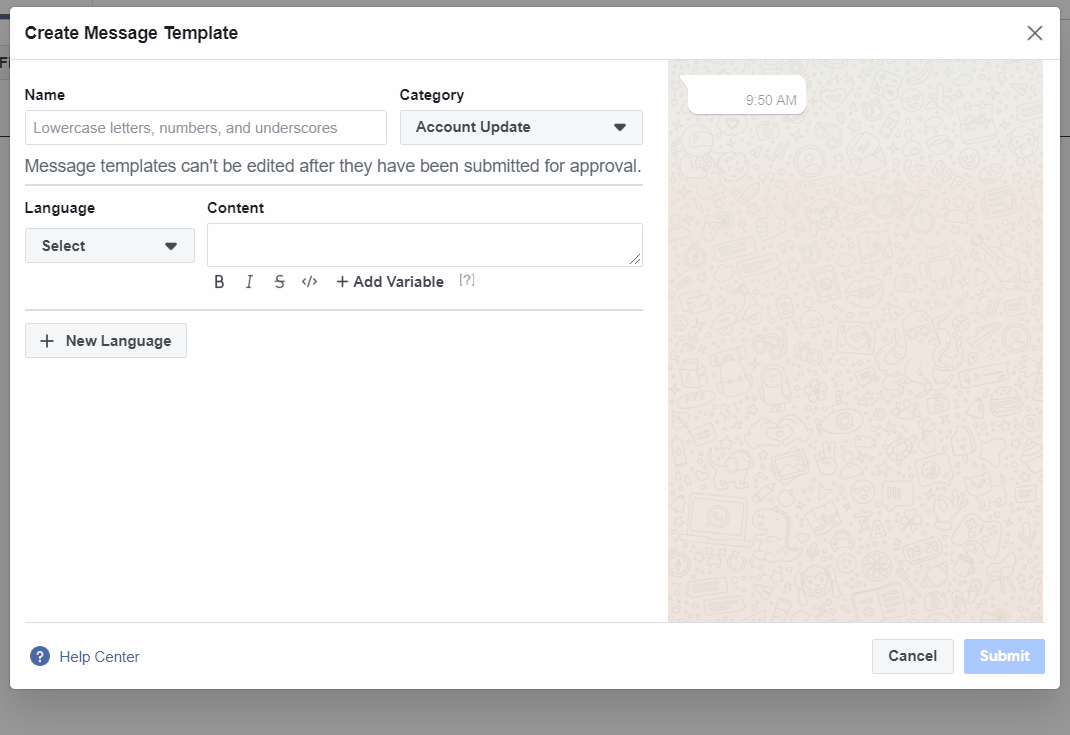
The steps involved in creating a message template are:
- Set the name of the template.
- Choose the category of the template. You can read more about the allowed categories in the next section.
- Select the language of the template. For a given template type, you can have multiple language versions of it.
- Insert the content of the template. Inside the content, you can use rich text elements like Bold, Italics, etc. and you can also insert variables in it.
- Once satisfied, click on submit to submit the message template for approval.
Note: Once approved, the message template content cannot be edited.
Adding buttons to Message templates
WhatsApp allows buttons to be added to the message template. The Buttons section is located at the bottom of the message template page (assuming that you are either creating a new template or editing an existing one). There are two broad categories of buttons that you can add to your template:
- Quick Reply
- Call To Action
1. Quick Reply:
A message template can have at the most 3 quick reply buttons. Quick Reply buttons as their name implies, are buttons that when tapped on by the user, send the title of those buttons as a message from that user. You can even provide a payload to override the message that gets sent back on button click.
Known limitations:
- At most 3 quick reply Buttons.
- The text of each button can be no more than 20 characters.
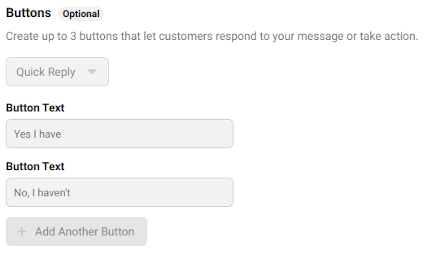
Steps to add Quick Reply buttons:
- In the Buttons section, click the dropdown which by default is set to None, and choose Quick Reply.
- A new input field titled Button Text will appear.
- Enter the text which is to be shown in the Quick Reply.
- To add more buttons, click on Add Another Button and repeat the above step.
- Once you save your message template, this configuration gets stored along with it.
Quick Reply buttons in the message template builder
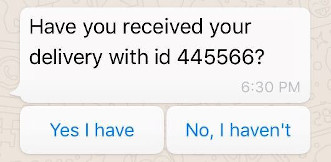
Quick Reply buttons in users' Whatsapp Messenger
API Request to send
Sending a message template with Quick Replies is similar to sending any other template. The only difference is when you would like to send a payload with the template.
- What is a payload in Quick Reply?
- payload is information you would like to send back to the Haptik API when a Quick Reply button is clicked.
- For instance, in our above example we have a template that sends two Quick Reply buttons viz, Yes and No.
- Let's say when the message template is sent to the user, the button Yes is configured without any payload, but the button No has a payloadNo, I did not receive the order.
- Now, inside WhatsApp Messenger, if the user clicks on Yes, the reply sent to Haptik API will be Yes.
- However, if the user clicks on No, the reply sent back to Haptik API will be No, I did not receive the order i.e. the payload will be sent back.
Sample CURL request for sending payload for Quick Reply. (Note how the index is used to target specific buttons)
index: Zero-based index to appropriately target the button for which you are sending the param. For instance, if you are sending the payload for your second button then the value of the index would be 1.
curl -X POST <base_url>/whatsapp/notification/v2/ \
    -H 'client-id: <client-id>' \
    -H 'Authorization: Bearer <token>' \
    -H 'Content-Type: application/json' \
    -d '{
"business_id": <ID of the business as a number>,
    "to": "<phone number>",
    "type": "template",
    "template": {
        "namespace": "<from whatsapp dashboard>",
        "name": "<name of the template>",
        "language": {
            "policy": "deterministic",
            "code": "en"
        },
        "components": [{
            "type": "button",
            "sub_type": "quick_reply",
            "index": "1",
            "parameters": [{
                "type": "payload",
                "payload": "<payload value>"
            }]
        }]
    }
}
'
2. Call to Action:
A Call To Action button as the name implies is a button that when clicked by the user would cause a certain action to be called or performed right on the user's device.
Call To Action buttons are further divided into two types:
- Call Phone number
- Visit Website
Known limitations:
- Max two buttons i.e. one of each type (Call Phone Number or Visit Website)
- The text of each button can be no more than 20 characters
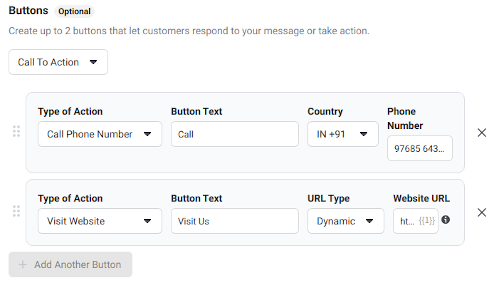
Steps to add Call To Action buttons:
- In the Buttons section, click the dropdown which by default is set to None, and choose Call To Action.
-
Call Phone Number:
- This button takes a phone number with country code and text to display on the button as parameters and when sent to the user, this button on click will actually initiate a phone call to the said number.
- When Call Phone Number is selected in Type of Action you get the following columns adjacent to it viz. Button Text, Country, Phone Number.
-
Visit Website:
- This button takes a website URL and text to display on the button as parameters and when sent to the user, this button click will actually launch the website on the user's phone.
- When Visit Website is selected in Type of Action you get the following columns adjacent to it viz. Button Text, URL Type, Website URL.
- URL Type is a drop-down in itself which has two options viz. Static and Dynamic.
- A Static URL is self-explanatory. It is basically a hardcoded website URL.
- A Dynamic URL is a URL that will have a parameter that will be suffixed to it to form the final URL.
For example, if the URL entered for the Dynamic field is https://<sitedomain>.com, then while sending a message template, a parameter will have to be sent which will be suffixed to this URL. Thus, if you send the parameter as 1234 then when the user receives this template and clicks on this button, the URL launched would be https://<sitedomain>.com/1234. - Do note that sending the parameter for Dynamic URL in the message template while sending requests is mandatory.
Call To Action buttons in the message template builder
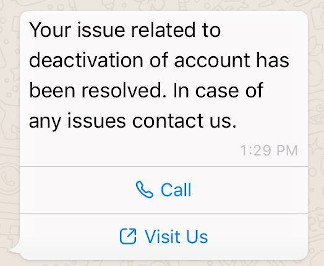
Call To Action buttons in user's WhatsApp Messenger
API Request to send
Sending a message template with Call To Action buttons is similar to sending any other template. The only difference is when you would like to send a parameter to the dynamic URL. Do note that the parameter sent to the dynamic URL should be a URL safe string since it would be appended at the end of the base_URL provided in the message template builder.
Sample CURL request for sending parameter for dynamic URL. (Note how the index is used to target the dynamic URL button)
index: Zero-based index to appropriately target the button for which you are sending the param. For instance, if you are sending the dynamic URL param for your second button then the value of index would be 1
curl -X POST <base_url>/whatsapp/notification/v2/ \
    -H 'client-id: <client-id>' \
    -H 'Authorization: Bearer <token>' \
    -H 'Content-Type: application/json' \
    -d '{
"business_id": <ID of the business as a number>,
    "to": "<phone number>",
    "type": "template",
    "template": {
        "namespace": "<from whatsapp dashboard>",
        "name": "<name of the template>",
        "language": {
            "policy": "deterministic",
            "code": "en"
        },
        "components": [{
            "type": "button",
            "sub_type": "url",
            "index": "1",
            "parameters": [{
                "type": "text",
                "text": "<text to append after URL>"
            }]
        }]
    }
}
'
Adding media to message templates
Not only text-based templates, but you can also send media-based templates to your WhatsApp end users.
1. Image Message Template
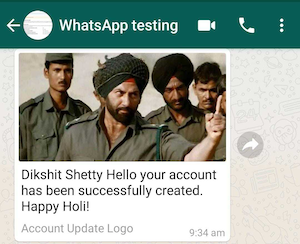
The template is sent with an image file as an attachment.
API Request to send
curl -X POST <base_url>/whatsapp/notification/v2/ \
    -H 'Authorization: Bearer <token>' \
    -H 'Content-Type: application/json' \
    -H 'client-id: <client-id>' \
    -d '{
"business_id": <ID of the business as a number>,
    "to": "<phone_number>",
    "type": "template",
    "template": {
        "namespace": "<from whatsapp dashboard>",
        "name": "<from whatsapp dashboard>",
        "language": {
            "policy": "deterministic",
            "code": "en"
        },
        "components": [{
                "type": "header",
                "parameters": [{
                    "type": "image",
                    "image": {
                        "link": "<URL of the image>"
                    }
                }]
            },
            {
                "type": "body",
                "parameters": [{
                    "type": "text",
                    "text": "<Param Value 1>"
                }]
            }
        ]
    }
}
'
2. Document Message Template
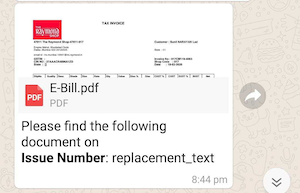
The template is sent with a PDF file as an attachment. Only PDFs are supported. Docx files are not supported as of now.
API Request to send
curl -X POST <base_url>/whatsapp/notification/v2/ \
    -H 'Authorization: Bearer <token>' \
    -H 'Content-Type: application/json' \
    -H 'client-id: <client-id>' \
    -d '{
"business_id": <ID of the business as a number>,
    "to": "<phone_number>",
    "type": "template",
    "template": {
        "namespace": "<from whatsapp dashboard>",
        "name": "<from whatsapp dashboard>",
        "language": {
            "policy": "deterministic",
            "code": "en"
        },
        "components": [{
                "type": "header",
                "parameters": [{
                    "type": "document",
                    "document": {
                        "link": "<URL>",
                        "filename": "<Filename to be displayed>"
                    }
                }]
            },
            {
                "type": "body",
                "parameters": [{
                    "type": "text",
                    "text": "<Param Value 1>"
                }]
            }
        ]
    }
}
'
3. Video Message Template
The template is sent with a Video file as an attachment.
API Request to send
curl -X POST <base_url>/whatsapp/notification/v2/ \
    -H 'Authorization: Bearer <token>' \
    -H 'Content-Type: application/json' \
    -H 'client-id: <client-id>' \
    -d '{
"business_id": <ID of the business as a number>,
    "to": "<phone_number>",
    "type": "template",
    "template": {
        "namespace": "<from whatsapp dashboard>",
        "name": "<from whatsapp dashboard>",
        "language": {
            "policy": "deterministic",
            "code": "en"
        },
        "components": [{
                "type": "header",
                "parameters": [{
                    "type": "video",
                    "video": {
                        "link": "<URL of the Video>"
                    }
                }]
            },
            {
                "type": "body",
                "parameters": [{
                    "type": "text",
                    "text": "<Param Value 1>"
                }]
            }
        ]
    }
}
'
Note:
The above structure is for reference only and will change based on the way we create a message template on Whatsapp Business Manager and for each media type.
Supported Media formats on WhatsApp
Media |
Content-Type |
|---|---|
Document |
Any valid MIME type |
Image |
.jpeg, .png |
Audio |
acc, mp3, mpeg, mpr, |
Video |
mp4, 3gpp |
