Contact Us

If you still have questions or prefer to get help directly from an agent, please submit a request.
We’ll get back to you as soon as possible.

Please fill out the contact form below and we will reply as soon as possible.

  • Go to Haptik Website
  • Contact Us
  • Home

How to configure Ticketing on Salesforce?

Written by Medha Anand

Updated on August 26th, 2022

Contact Us

If you still have questions or prefer to get help directly from an agent, please submit a request.
We’ll get back to you as soon as possible.

Please fill out the contact form below and we will reply as soon as possible.

  • Getting Started
    Build Deploy Analyse Manage Account Bot Deactivation
  • Bot Building
    Essentials Smart Skills Steps User Messages Bot Responses Entities Connections Customisations User feedback collection Testing Whatsapp Bots NLU
  • Conversation Design
    Design Basics Design Guides Designing for Platforms Designing WhatsApp Bots
  • Developer Guides
    Code Step Integration Static Step Integration Shopify Integration SETU Integration Exotel Integration CIBIL integration Freshdesk KMS Integration PayU Integration Zendesk Guide Integration Twilio Integration Razorpay Integration LeadSquared Integration USU(Unymira) Integration Helo(VivaConnect) Integration Salesforce KMS Integration Stripe Integration PayPal Integration CleverTap Integration Fynd Integration HubSpot Integration Magento Integration WooCommerce Integration
  • Deployment
    Web SDK WhatsApp Facebook Instagram Sunshine Conversation LINE Google Business Messages Telegram MS Teams Bot as an API iOS SDK Android SDK
  • Agent Setup
    Haptik's Smart Agent Chat Zendesk Chat Salesforce Service Cloud Freshchat Zoho NICE CXOne Gorgias
  • Analytics & Reporting
    Intelligent Analytics
  • Proactive Messaging
    WhatsApp Notifications & Templates Team and User Management APIs and Integrations SMS Notifications Embedded Signup Proactive Messaging Attribution
  • Commerce Plus
    Commerce Plus for Instagram Commerce Plus for Facebook Catalog Localization
  • Troubleshooting Guides
    Error Messages FAQs
  • Release Notes
+ More

In order to enable Ticketing on Salesforce, you will first have to set up a Connected App. You can read more about that in the following article. 

Setting up a Connected App on Salesforce Setup

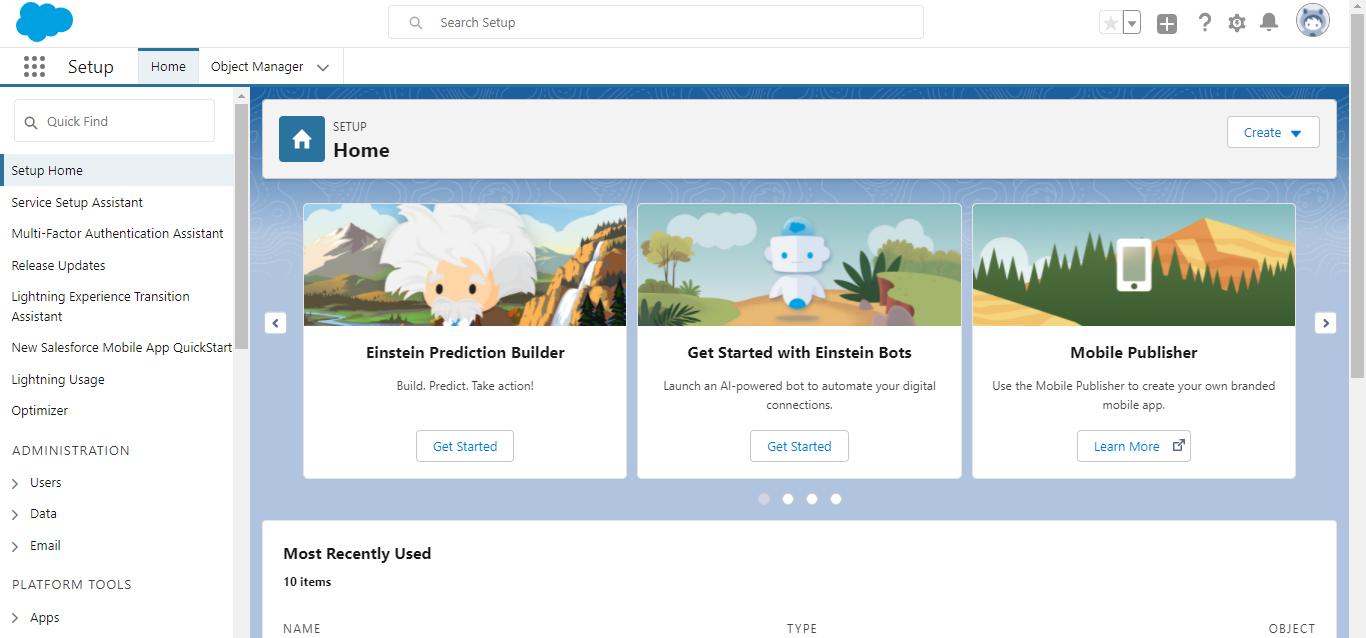
Step 1: Navigate to the Setup dashboard of Salesforce, as shown.

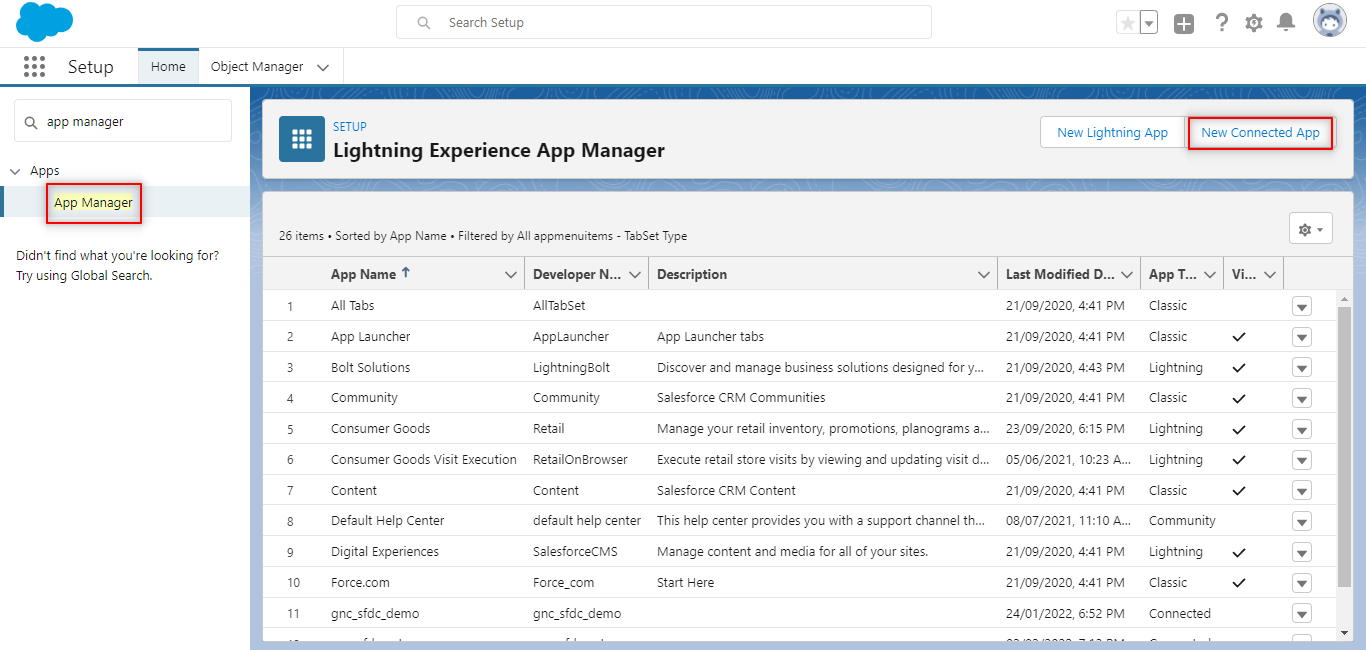
Step 2: Search for App Manager from the Quick find, and select New Connected App.

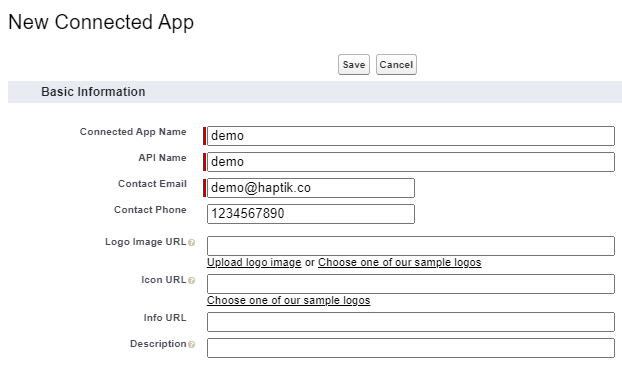
Step 3: Under Basic Information, fill the mandatory fields, as shown.

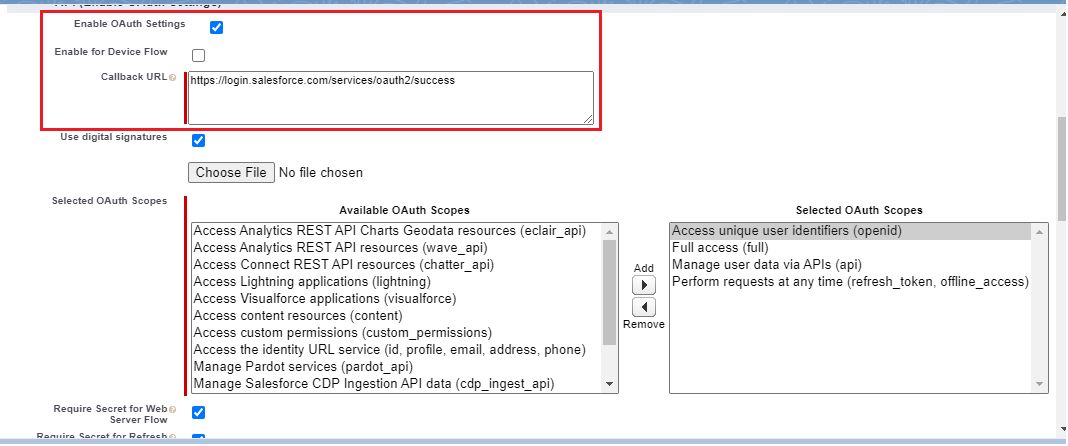
Step 4: Check the box for Enable OAuth Settings, and add this call back URL - https://login.salesforce.com/services/oauth2/success

Delete

OAuth scopes that needs to be added for the app are -

  • Allow access to your unique identifier.
  • Perform requests on your behalf at any time.
  • Provide access to your data via the Web.
  • Access and manage your data.
  • Full Access (To access features like create lead).

Step 5: Next, check the box for digital signatures, upload the generated certificate file and also generate a private key. 

Delete

For generating the certificate file and private key, run the below commands on openssl environment -

openssl genrsa 2048 > host.key
chmod 400 host.key
openssl req -new -x509 -nodes -sha256 -days 365 -key host.key -out host.cert

Upload the host.cert file by selecting the Choose File button.

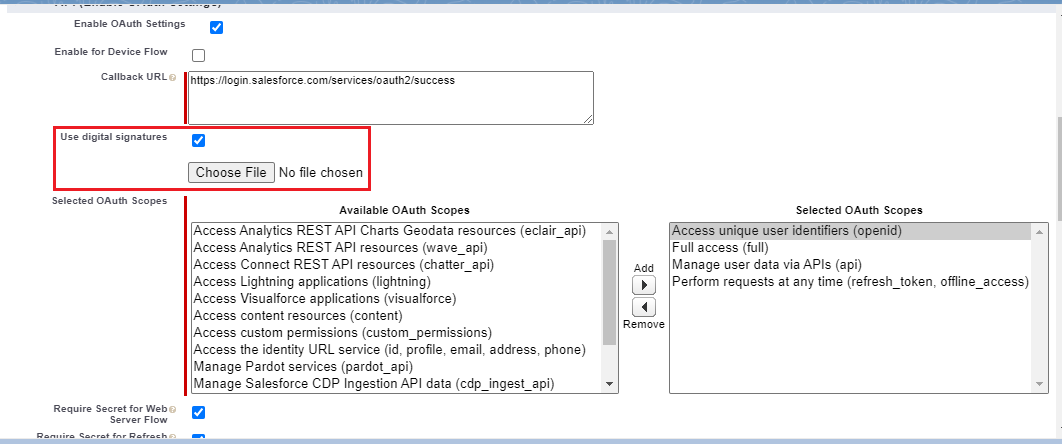
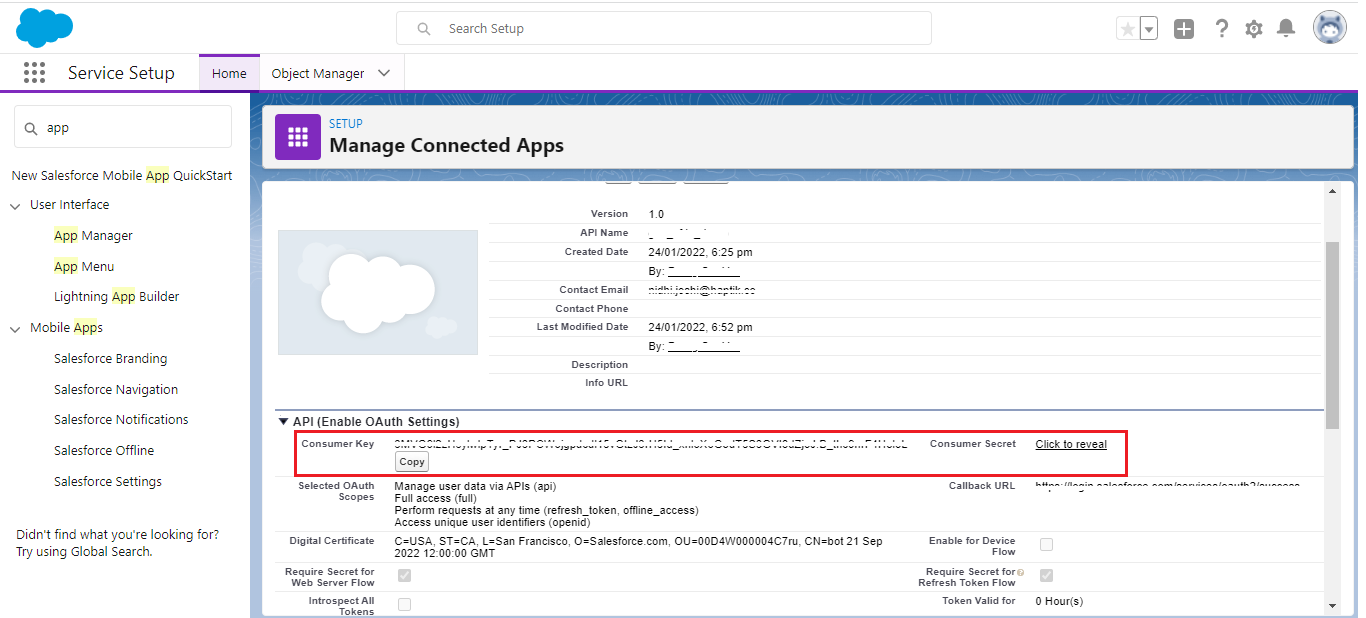
Step 6: After clicking on save and continue, Consumer Key and Secret will be generated, note these down for future reference.

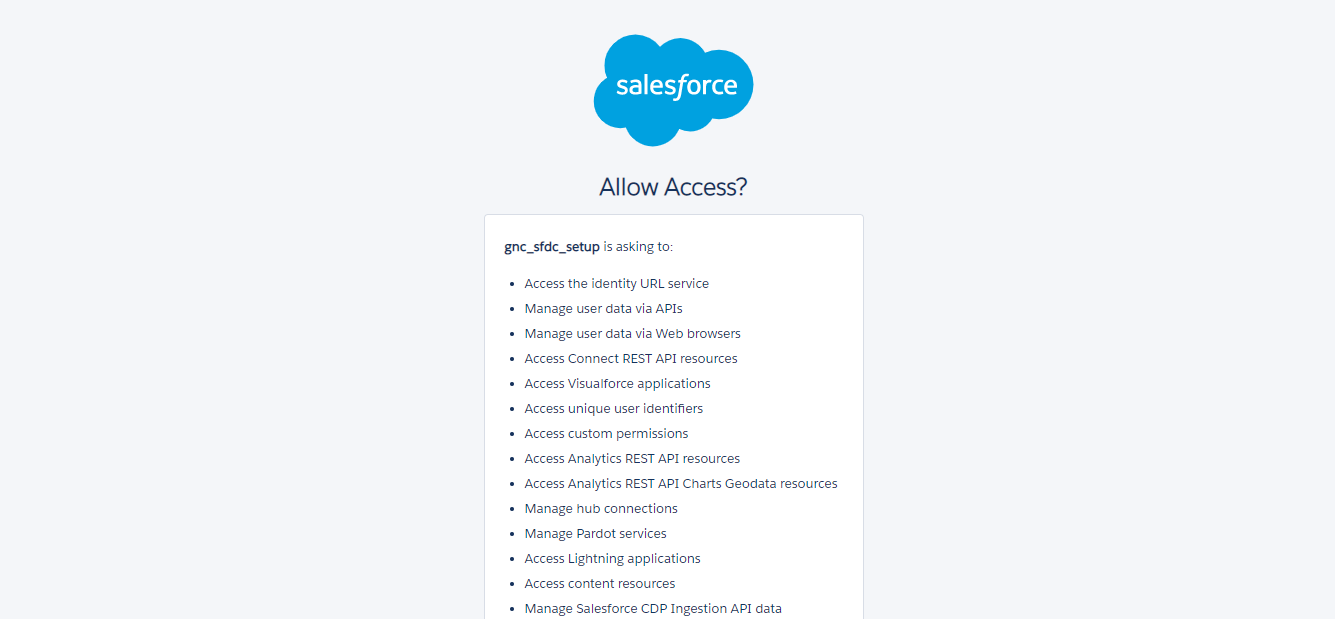
Step 7: To authorize the App, navigate to the below URL -

https://<salesforce_domain>/services/oauth2/authorize?response_type=token&client_id=<client_id>&redirect_uri=https://login.salesforce.com/services/oauth2/success

Delete

Note:

salesforce_domain is your domain URL(can be found by searching domain on LHS Quick find)

client_id field will contain the Consumer Key

On clicking the above URL, the authorization page opens up as shown. Cick on Allow for all the stated permissions.

Step 8: The clientId(consumer key) and username will be used for creating the Connected Application with Haptik.

Now that you are done with creating and configuring a Connected App, you can move to implementing ticketing on Salesforce. To know how to implement ticketing on Salesforce, click here.

Was this article helpful?

Yes
No
Give feedback about this article

Related Articles

  • How to implement Ticketing on Salesforce?

Platform

  • Conversation Studio
  • Smart Skills
  • Advanced NLU
  • Intelligent Analytics
  • Omnichannel
  • Smart Agent Chat
  • Enterprise Security
  • Integrations

Solutions

  • Conversational Commerce
  • Lead Generation
  • Customer Care
  • WhatsApp
  • Conversational IVR
  • Google Business Messages

Industries

  • Retail/ E-Commerce
  • Financial Services
  • Travel & Hospitality
  • Telecom

Knowledge

  • ROI Calculator
  • Reports & Research
  • Case Studies
  • Webinars
  • ISAT
  • Tech Blog
  • Business Blog
  • Resources
  • Haptik v/s Yellow
  • Haptik v/s Liveperson
  • Haptik v/s IBM Watson
  • Haptik v/s Verloop
  • Conversations on AI

Company

  • Why Haptik
  • About Us
  • Careers
  • News & Media
  • Awards & Recognition
  • Contact Us
  • Partnerships
  • Investor Relations

Subscribe

Sign up to recieve the latest updates

Find us on

  • Twitter-footer
  • Linkedin-footer
  • YT-footer
  • Insta-footer
  • G2-footer
  • Facebook-footer

Copyright © jio Haptik Technology Limited 2021 | Data Security & Privacy Policy | GDPR

North America | Asia Pacific | Africa | enterprise@haptik.ai

Definition by Author

0
0