How to use User Journey on Intelligent Analytics?

Written by Soham Amburle
Updated on February 14th, 2023
- Getting Started
- Bot Building
- Smart Agent Chat
- Conversation Design
-
Developer Guides
Code Step Integration Static Step Integration Shopify Integration SETU Integration Exotel Integration CIBIL integration Freshdesk KMS Integration PayU Integration Zendesk Guide Integration Twilio Integration Razorpay Integration LeadSquared Integration USU(Unymira) Integration Helo(VivaConnect) Integration Salesforce KMS Integration Stripe Integration PayPal Integration CleverTap Integration Fynd Integration HubSpot Integration Magento Integration WooCommerce Integration Microsoft Dynamics 365 Integration
- Deployment
- External Agent Tool Setup
- Analytics & Reporting
- Notifications
- Commerce Plus
- Troubleshooting Guides
- Release Notes
Table of Contents
If you have deployed a Bot, it is quite important for you to know how your bot is performing, and understand the weak areas of your bot where a user asks a question and your bot is not able to answer it. You also need to know what are those sections in the conversational journey of your bot where the users are getting stuck or dropping off from the conversations. These are some of the key points that need to be thoroughly visualized and worked upon in order to ensure the optimum performance of your bot.
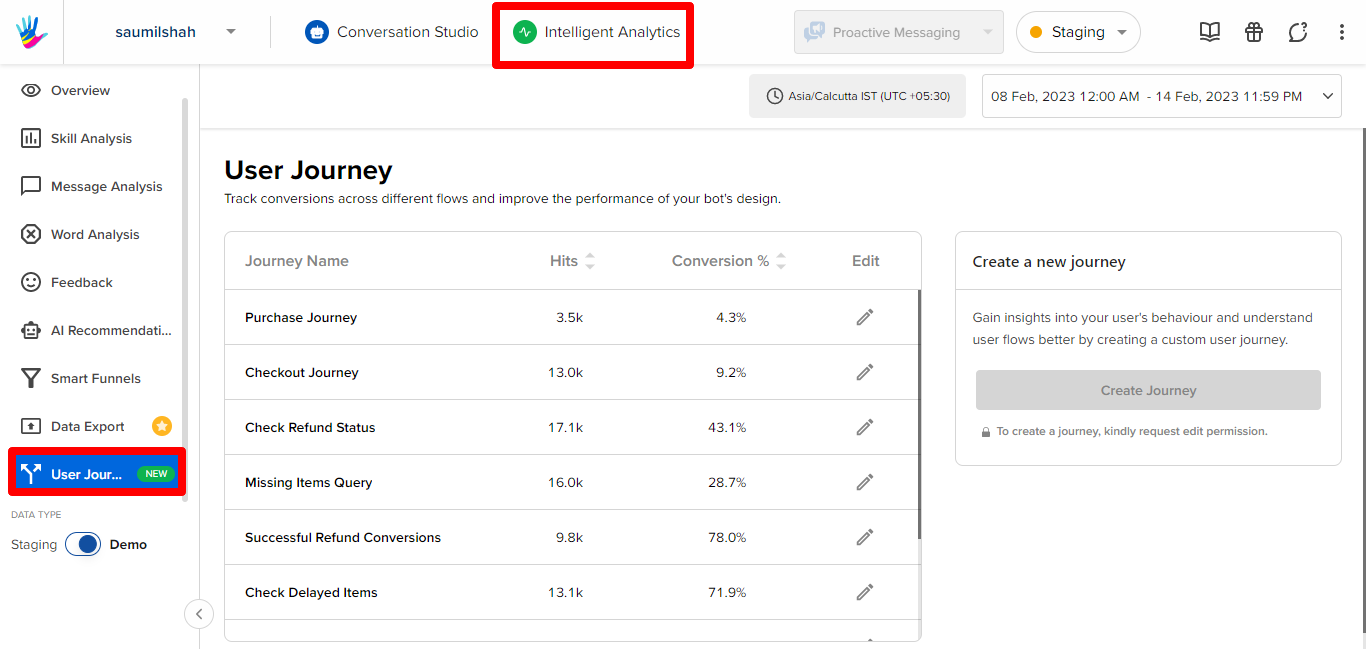
This is where "User Journey" comes into the picture. You can navigate to User Journey from Intelligent Analytics of your bot, as shown.
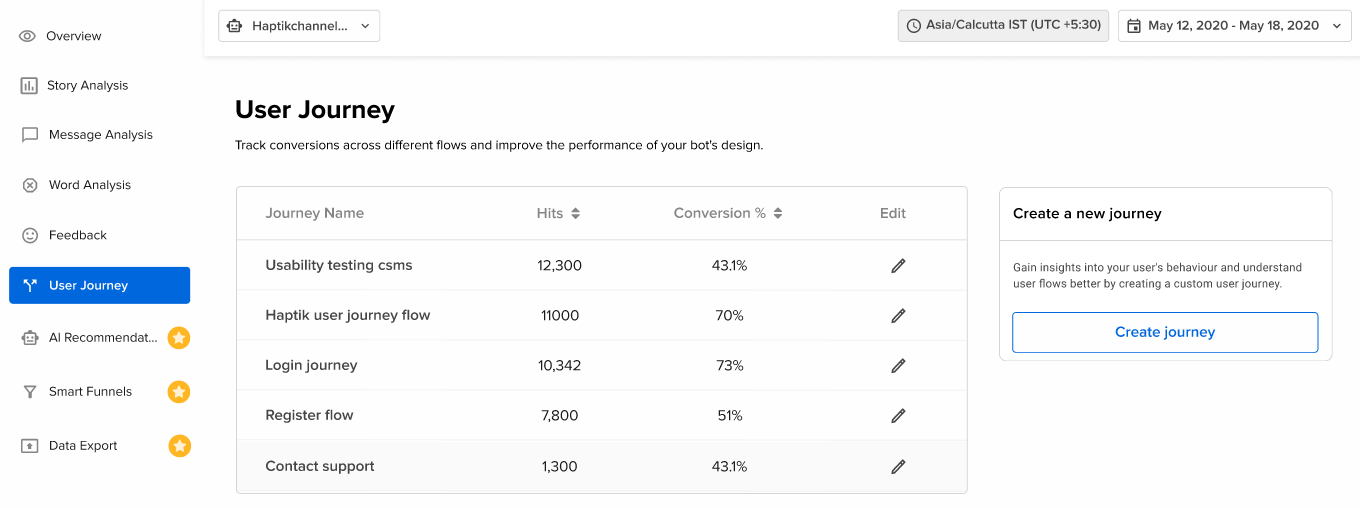
The main objective that can be achieved through User Journey is that it will help in identifying the Drop-off points, which will help you increase the automation percentage of your bot.
How does User Journey work?
In order to improve the Automation% for the bot, you will have to improve the performance of each individual conversational flow in your bot.

For example, let us consider the flow of the user's conversations as 1 → 2 → 3 → 4 → 5. Here, 1, 2, 3, 4, 5 are the Steps. You can refer to this as the Focus Journey. Your goal is to move the user forward in this Focus Journey. Every Focus Journey is made of Sub-focus Journeys of 2 Steps each.
Example: 1 → 2, 3 → 4, 4 → 5.
Your goal is to maximize the conversion within the Sub-focus Journeys. Conversion can be defined as the ratio of the number of conversations at this Step, to the number of conversations at the previous Step.
Example: Consider the Sub-focus journey of 2 → 3. If there are 100 conversations that start at Step 2, and 20 conversations reach Step 3, then the number of converted conversations for this Sub-focus journey will be 20 and the Conversion% will be 20%.
This also means that 80 conversations could not be converted (also known as Non-converted conversations). It is these conversations that you need to further analyze and work on, as these are the ones that have been impacted.
Why does the conversation end up becoming a Non-converted conversation?
Well, there can be many reasons for this. If a user asks a particular query to the bot, and if the bot is not able to address that query, the bot will break, which will lead to the user dropping off from the conversation, or it might also happen that the bot sends a wrong response to the user and due to this, the user might end up in some other flow. In both cases, the user does not follow the User Journey that he should be following.
Unless you examine each and every aspect that led to Non-converted conversations, you will not be able to make the necessary changes to the bot.
So, under this User Journey feature, these Non-converted Conversations are analyzed with 2 possibilities,
- Abandonment
- Diversion
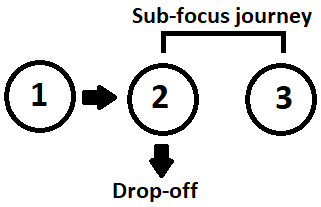
Abandonment
Assume the Sub-focus journey to be 2 → 3.
Here, the user is at Step 2 and he does not proceed to Step 3 which is he does not complete the Sub-focus journey. He does not enter any out-of-focus journey as well.
So, in this case, we can say that the user has abandoned the conversation, meaning the user has simply left the bot.
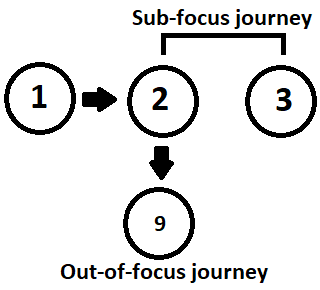
Diversion
Assume the Sub-focus journey to be 2 → 3.
Here, the user is at Step 2 and he does not proceed to Step 3 which is he does not complete the Sub-focus journey. But he has not abandoned the conversation as well.
In this case, we can say that the user has diverted to another Step rather than moving to Step 3, which means that the user has entered an out-of-focus journey. In the image shown below, the user has entered Step 9, rather than moving to Step 3. So, this is Diversion.
To understand where the user has dropped off, or at which point the user diverted to some other flow, we need to create a User Journey, which will give us insights on this.
How to create a User Journey?
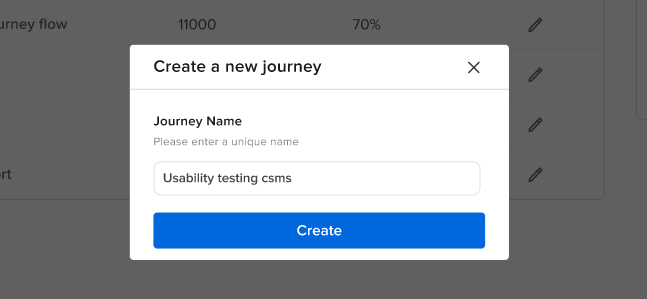
You can create a User Journey, by clicking on the Create Journey button, as shown below.

Next, you will have to enter a name for the User Journey.
Now that the User Journey has been created, you will have to add Steps to it, in order to create a flow from one Step to another Step.
Click on Click here to add a Step button, and a pop-up will appear on your screen with a list of Steps from your bot. You can select the Steps from this pop-up itself, as shown. You need to select a minimum of 2 Steps here.
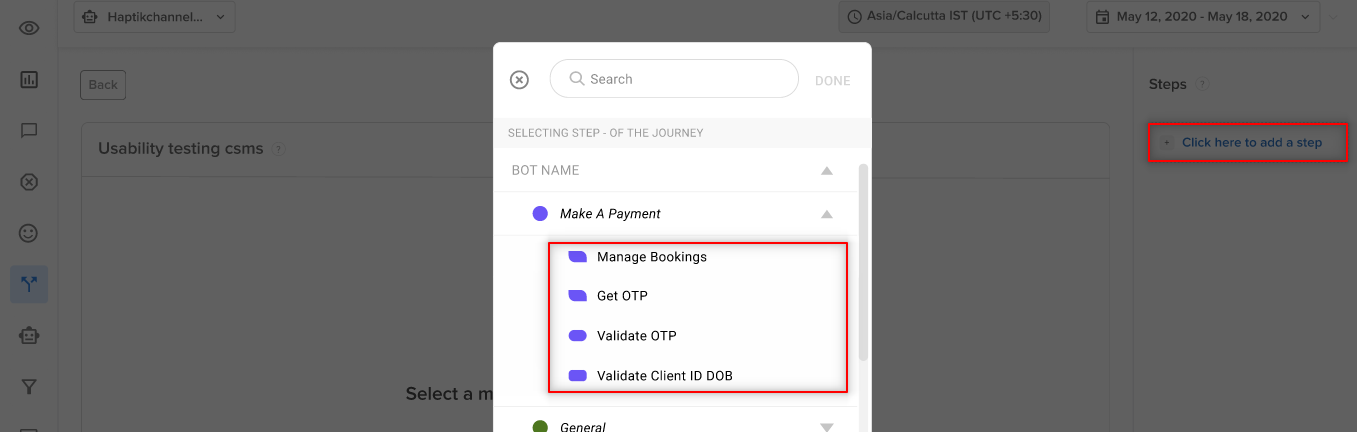
You can select the Steps that comprise the journey, that you are interested in. Once you have added the Steps to your User Journey, you will be able to see the following data on your screen.
How to analyze the User Journey?
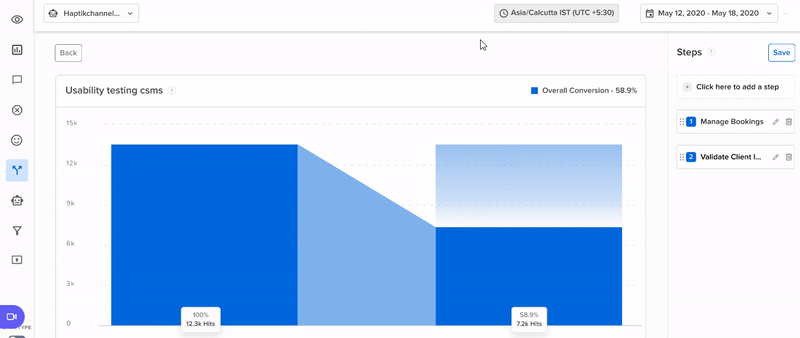
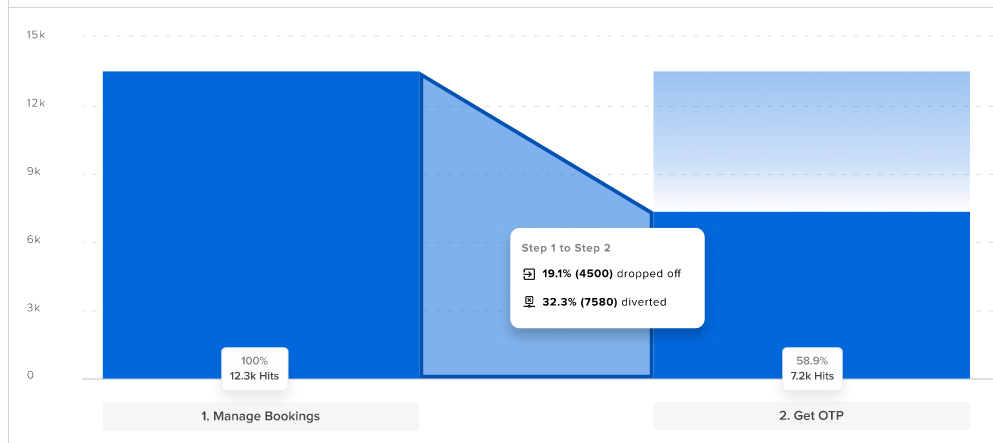
Once you have added a User Journey by selecting the steps, you would see the following graph first.
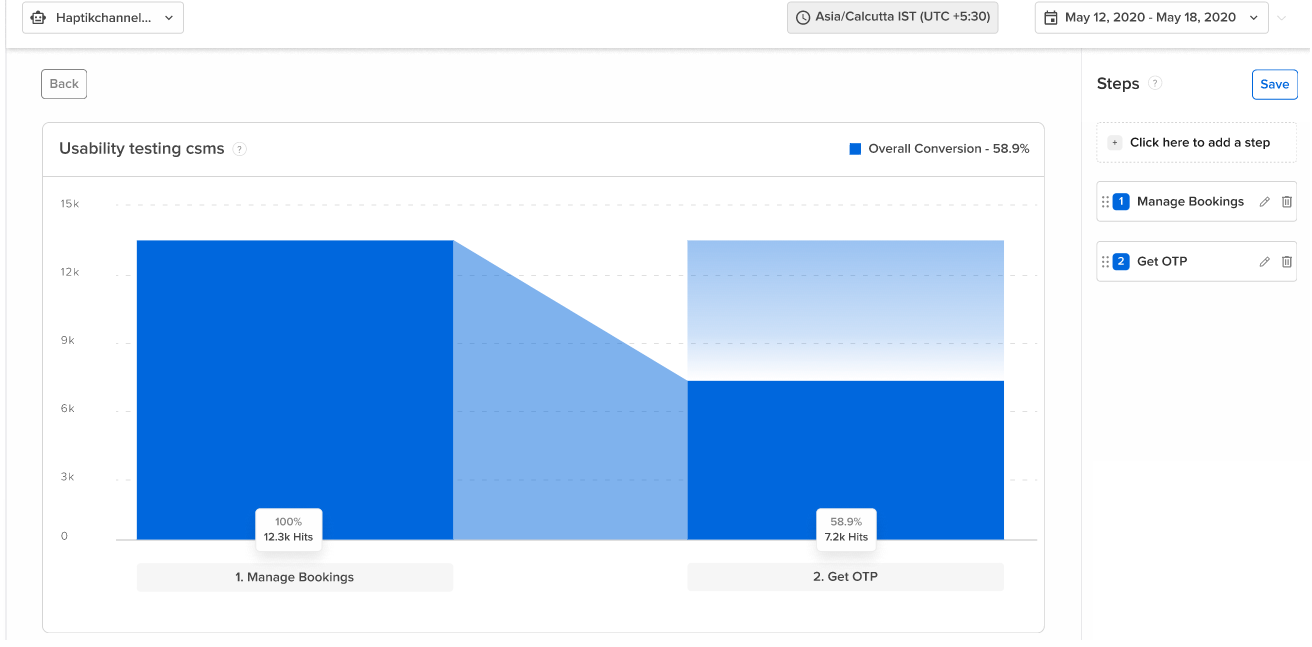
Here, in this graph, we see certain data linked to every Step. Let us understand that in detail.
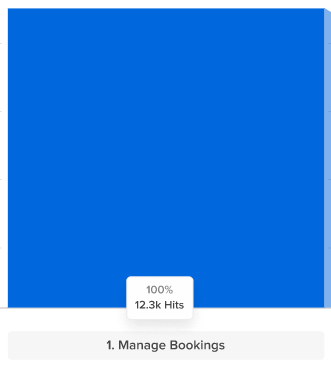
Manage Bookings - 100% - 12.3K Hits
Here, the Conversion percentage is 100%, and the absolute user count is 12.3K.
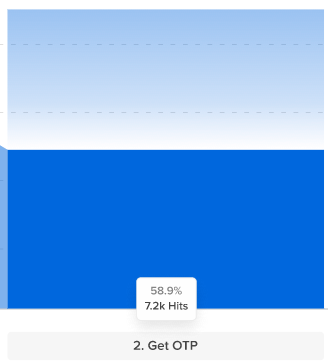
Get OTP - 58.9% - 7.2K Hits
Here, the Conversion percentage is 58.9%, and the absolute user count is 7.2k, which has dropped as the user moved from Step 1 to Step 2.
If you hover over the portion between the two bars, you will get a detailed analysis of why there has been a drop in conversion percentage. As shown in the image below, 19.1% of the users dropped off, whereas 32.3% were diverted.
When you further scroll the screen, you will be able to see the Summary of the data from the graph, followed by Diversions in a tabular format.
Summary
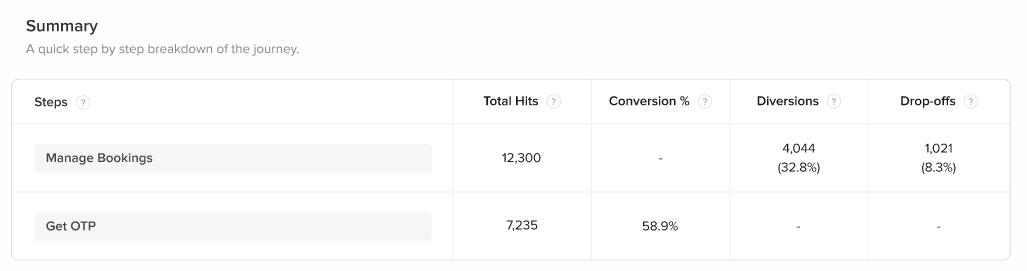
The summary gives you an understanding of statistics related to the User Journey, and there are five major components present in this table, as shown in the image.
- Steps: Step in the User Journey.
- Total Hits: Total Number of Users who reached that Step.
- Conversion%: Conversion% is the ratio of the number of conversations at this Step, to the number of conversations at the previous Step.
- Diversions: Total Number of Users, that diverted to another Step.
- Drop-Offs: Total Number of Users, who left the bot.
Diversions
 The Diversions table will highlight the Steps to which the user was diverted. These are the Steps where the user went, rather than following the flow that was supposed to be followed.
- Steps: Details about the Step in the User Journey. (If the User Journey has 2 Steps, the first Step will be shown in the Steps column, and if the User Journey has 3 Steps, then first two Steps will be shown in the Steps column, and so on).
- Diverted to: This column has the Step names, to which the Users were diverted to.
- Count: Total Number of Users.
This way you can make use of the User Journey feature to view and analyze drop-off points, as well as diversions, and accordingly, you can make changes to the Steps, to better serve the users.
Analyzing User Journeys based on User Acquisition Source
Customers with a ‘Click to Haptik’ subscription can easily filter users based on the acquisition source. Here's how to set user journey filters to get specific data when required.
- Navigate to the User Journey tab available in the Intelligent Analytics of your bot.
- Select a user journey for which you want to set filters.
- Click Filters to see the available options.
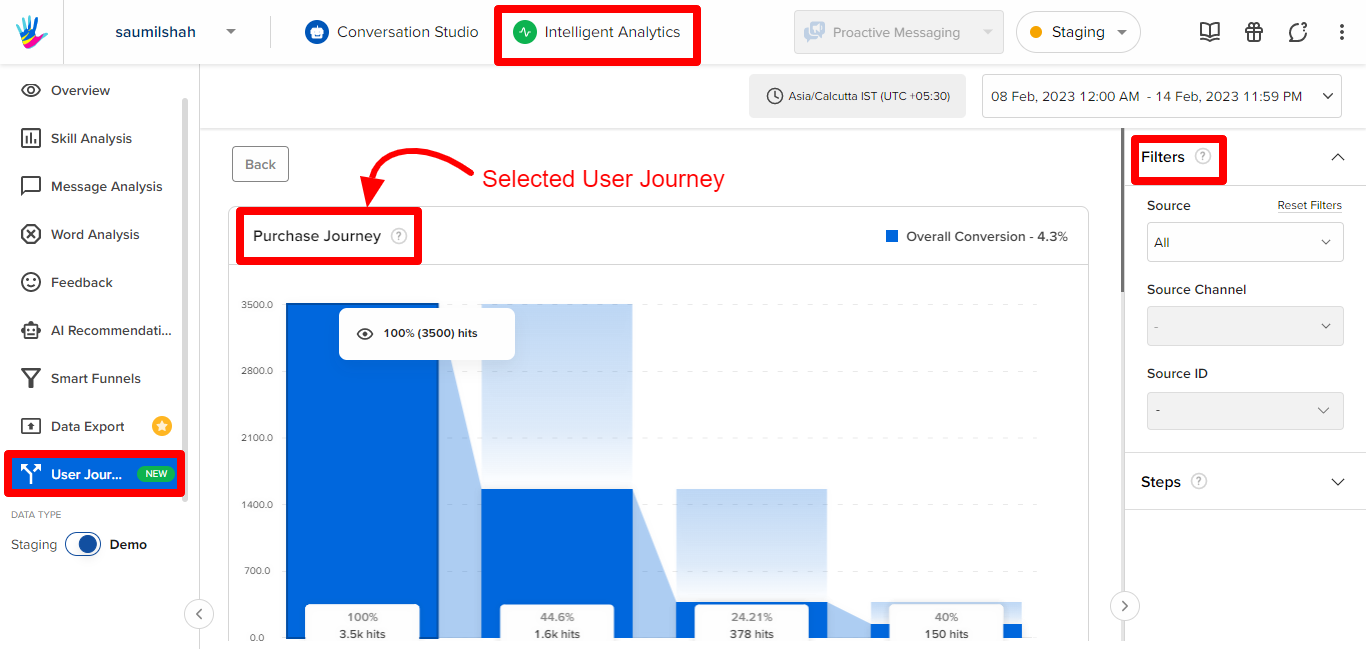
The Source filter drop-down has four options: All, Ads, ProM (Proactive Messaging), and Organic. Three cases are likely to happen when setting filters.
Case 1: Source channel and Source ID fields won’t be editable if you select All or Organic.
Case 2: If you select Ads, the Source Channel will be automatically set to Meta (the only option as of now), whereas the Source ID will be your Ad ID.
Case 3: If you select ProM, the Source Channel will be automatically set to Meta (the only option as of now), whereas the Source ID will be your Conversation ID.
Feeling the results are inaccurate? Get in touch with your Haptik SPOC for better understanding.
