What is Static Step Integration
- Getting Started
- Bot Building
- Smart Agent Chat
- Conversation Design
-
Developer Guides
Code Step Integration Static Step Integration Shopify Integration SETU Integration Exotel Integration CIBIL integration Freshdesk KMS Integration PayU Integration Zendesk Guide Integration Twilio Integration Razorpay Integration LeadSquared Integration USU(Unymira) Integration Helo(VivaConnect) Integration Salesforce KMS Integration Stripe Integration PayPal Integration CleverTap Integration Fynd Integration HubSpot Integration Magento Integration WooCommerce Integration Microsoft Dynamics 365 Integration
- Deployment
- External Agent Tool Setup
- Analytics & Reporting
- Notifications
- Commerce Plus
- Troubleshooting Guides
- Release Notes
Table of Contents
IntroductionUsing Integrations under Static step1. Relative URLsSetting up base URLAdding integration endpointNote2. Override base URLs and use absolute URLsIntroduction
Once a particular step has been detected and the mandatory entities have been collected, these entities can be used to execute your own business logic by passing them to the APIs using Static step Integrations tab.
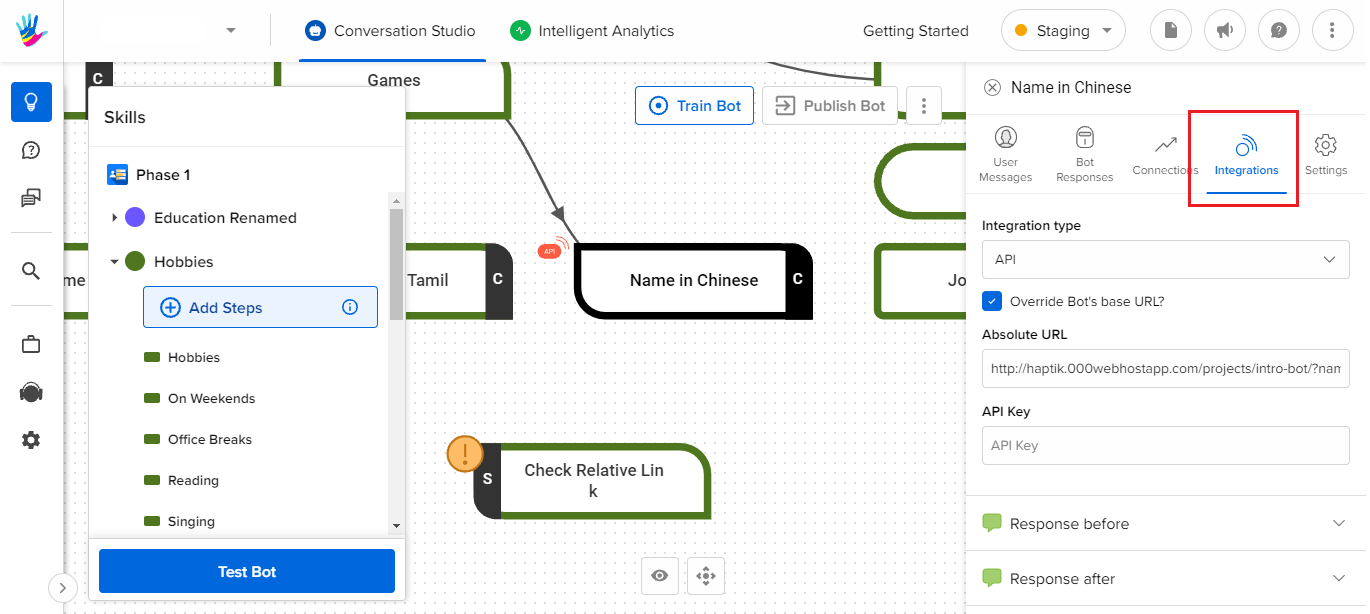
Using Integrations under Static step
A step can be configured to call an API once the required entities have been collected.
To deploy a live API that can receive the events, your code must be hosted on a public HTTP server that has the following:
- A Valid SSL Certificate
- An open port that accepts
GETandPOSTrequests
There are two ways to use APIs to integrate external code in your IVA. The two ways are:
1. Relative URLs
In the first method, you can set a common base URL for the IVA. And then you can add relative paths in the step where the integration is required. This method allows you to set two base URLs, one for the test environment and one for the production environment.
Having environment-specific base URLs allows you to easily test your bot with code from different environments. Also because only the production base URL will be used in production, this helps you avoid issues of accidentally having a production bot linked to non-production code.
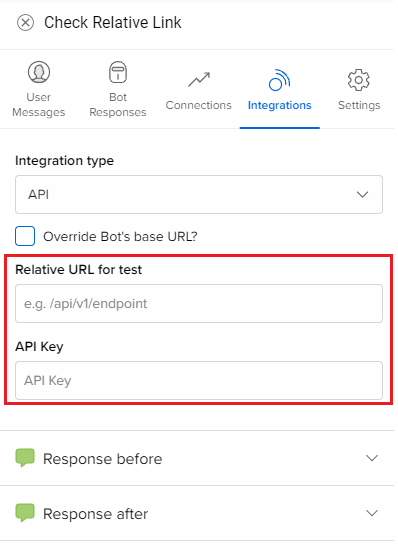
In your test environment, you can configure which environment's base URL to use. However, in production, only the production environment's base URL will be used. This is to ensure that the bots in production are only referring to production code.
Setting up base URL
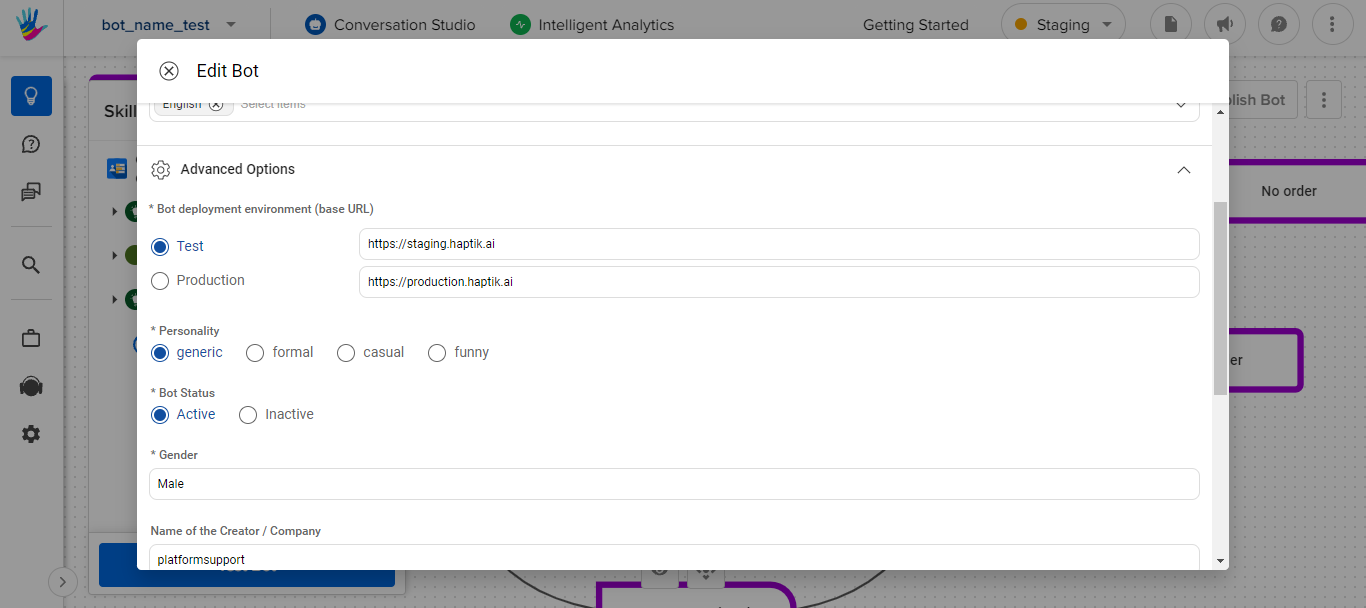
You can set the environment-specific base URLs while creating the bot as shown below.
- Click on Create Bot and navigate to IVA Settings
- Fill in details and scroll down to the
Bot deployment environmentsection. - Enter the environment-specific base URLs.
Adding integration endpoint
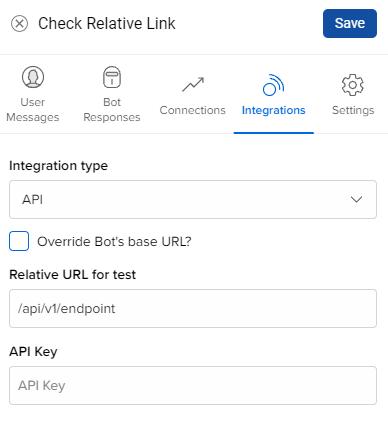
- Click on the step on which you want to add the integration function
- Select Integration
- Select API and put API endpoint like shown in image
2. Override base URLs and use absolute URLs
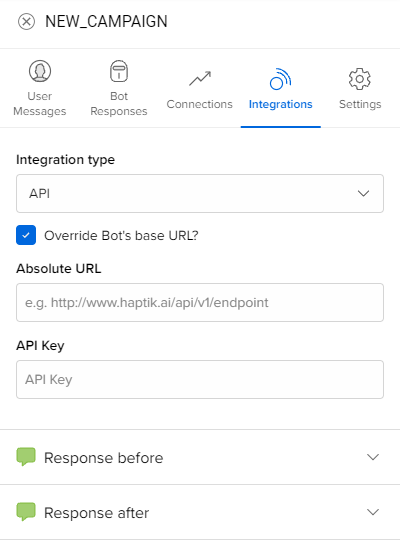
The second method is to use absolute URLs. There might be times where you want to use an API endpoint on a domain that is different from the base URL. In such cases, you can override the base URL as shown below. Just select the override base URL option and enter the full URL including the path in the text box.
Request Method
POST
Request Headers
| Header | Description |
|---|---|
| Content-Type | application/json |
| X-Hub-Signature | sha1=signature (The HMAC hex digest of the request body. This header will be sent if the step is configured with a secret. The HMAC hex digest is generated using the sha1 hash function and the secret as the HMAC key.) |
Request and Response Parameters Refer to the documentation here for request and response parameters.
Validate Webhook
The HTTP request will contain an X-Hub-Signature header which contains the SHA1 signature of the request payload, using the secret_key entered for the step, and prefixed with sha1=. Your API can verify this signature to validate the integrity and origin of the payload.
Sample python code for webhook
# !/usr/bin/env python
"""
Simple HTTP server in python for handling haptik webhooks.
Usage::
./test_server.py [<port>]
"""
import cgi
import json
import hmac
import hashlib
from BaseHTTPServer import BaseHTTPRequestHandler, HTTPServer
class WebhookServer(BaseHTTPRequestHandler):
 def _set_headers(self, status_code, content_type):
 self.send_response(status_code)
 self.send_header('Content-type', content_type)
 self.end_headers()
 def do_GET(self):
 self._set_headers(status_code=200, content_type='text/html')
 self.wfile.write("<html><body><h1>Test Server</h1></body></html>")
 def do_POST(self):
 content_type, pdict = cgi.parse_header(self.headers.getheader('Content-Type'))
 if content_type != 'application/json':
 self.send_response(400)
 self.end_headers()
 return
 length = int(self.headers.getheader('Content-Length'))
 if not length:
 self.send_response(400)
 self.end_headers()
 return
 body = self.rfile.read(length)
 data = json.loads(body)
 secret_key = 'test'
 hash_value = hmac.new(secret_key, body, hashlib.sha1).hexdigest()
 sha1_signature = 'sha1=' + str(hash_value)
 request_signature = self.headers.getheader('X-Hub-Signature')
 if sha1_signature != request_signature:
 self.send_response(401)
 self.end_headers()
 return
 entities = data['entities']
 product_name = entities['product_name'][0]['entity_value'] if entities.get('product_name') else None
 if product_name == 'speaker':
 message = 'The Wireless Radio Alarm Clock Speaker can be yours only for Rs.1599'
 elif product_name == 'powerbank':
 message = 'The Ambrane Powerbank can be yours only for Rs.1799'
 else:
 self.send_response(400)
 self.end_headers()
 return
 response = {"status": True, "response": [message]}
 self._set_headers(status_code=200, content_type='application/json')
 self.wfile.write(json.dumps(response))
 def run(server_class=HTTPServer, handler_class=WebhookServer, port=80):
 server_address = ('', port)
 httpd = server_class(server_address, handler_class)
 print 'Starting test server...'
 httpd.serve_forever()
if __name__ == "__main__":
 from sys import argv
 if len(argv) == 2:
 run(port=int(argv[1]))
 else:
 run()