What is Ads Attribution?

Written by Soham Amburle
Updated on March 1st, 2023
- Getting Started
- Bot Building
- Smart Agent Chat
- Conversation Design
-
Developer Guides
Code Step Integration Static Step Integration Shopify Integration SETU Integration Exotel Integration CIBIL integration Freshdesk KMS Integration PayU Integration Zendesk Guide Integration Twilio Integration Razorpay Integration LeadSquared Integration USU(Unymira) Integration Helo(VivaConnect) Integration Salesforce KMS Integration Stripe Integration PayPal Integration CleverTap Integration Fynd Integration HubSpot Integration Magento Integration WooCommerce Integration Microsoft Dynamics 365 Integration
- Deployment
- External Agent Tool Setup
- Analytics & Reporting
- Notifications
- Commerce Plus
- Troubleshooting Guides
- Release Notes
Table of Contents
Consider, a user named "Taylor" was scrolling her Instagram feed and she came across an ad from Fab Cart. Since she was interested in the showcased products, she decided to use the Click to Haptik feature, wherein when she chose to have a conversation, she was directed to an Instagram DM of the Fab Cart page, as shown below.
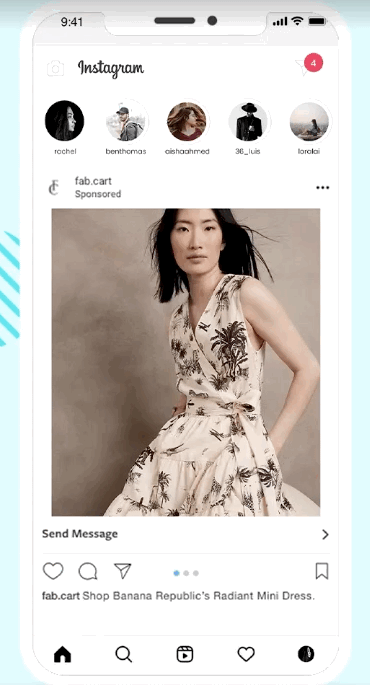
Taylor chats with the bot and gets her queries resolved regarding the product, and here a conversation has been successfully established, where a consumer/buyer is having a conversation with the bot and now the buyer has to decide whether to purchase the product or not.
Here, this conversation between Taylor and Fab Cart bot is just as same as any other conversation a user has with any bot. The only difference here is, that Taylor chose to chat with the bot by clicking on the chat option that was presented to her as she was scrolling through the products by Fab Car on her Instagram feed. This is Ads Attribution, where an Ad was responsible for getting the conversation started between a user and a business.
How to Check Ads Attribution?
Checking Ads Attribution is basically analyzing the chats that were initiated because of an Ad posted on Instagram or Facebook. In order to analyze these chats, you need to navigate to the Intelligent Analytics tool as below. This is what called Click to Haptik feature. There are two ways to do that.

Automated Analysis
In Intelligent Analytics, you can navigate to Click to Haptik, as shown.
Log-in with the Facebook credentials of your ad-manager account and provide access to the meta ad-manager account to show them end-to-end metrics of their conversational ads journey. On providing the permissions, you will be ready to analyze the promotional campaigns’ performance along with their user journeys as below.
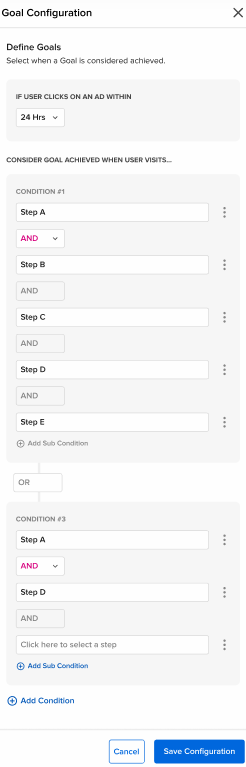
Goal Configuration
Usually, brands have different definitions of goals and can’t rely on a single predefined definition of a lead. Keeping this in mind, Haptik now provides brands the ability to configure the definition of a goal according to their needs. Click on the three button icon visible on the top right corner of the Click to Haptik screen and click Goal configuration to configure the goal definition.
A goal can be defined as a user hitting an individual node or any combination of nodes in the conversational journey. For complex goals, brands can add up-to 5 conditions in a goal configuration and up to 5 sub conditions in each condition. The first selection of the operator (AND/OR) in a condition will be applicable to all other conditions and likewise the first operator in a sub condition will be applicable to all other sub conditions inside a condition.
In case a condition or a sub condition needs to be deleted, the same can be done using the three dots in front of the condition or sub condition to be deleted
Once the goal is configured, you can save the configuration. This configuration will be used to calculate the goals achieved from ads and/or proactive messaging campaigns on Click to Haptik.
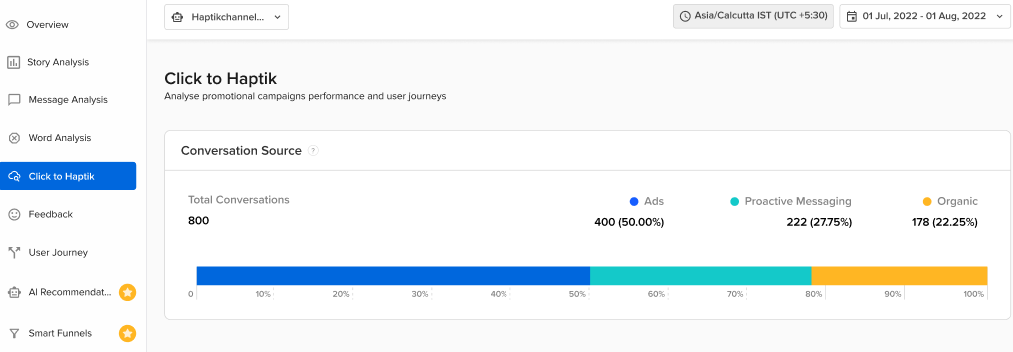
The Click to Haptik page consists of three sections:
Conversational Source
This section displays a detailed view of all conversations taken up by the bot depending upon its source.
- Ads: Number of conversations attributed to a meta paid promotion
- Organic: Number of conversations initiated organically (without any meta ad)
- Proactive Messaging: Number of conversations initiated via ProM.
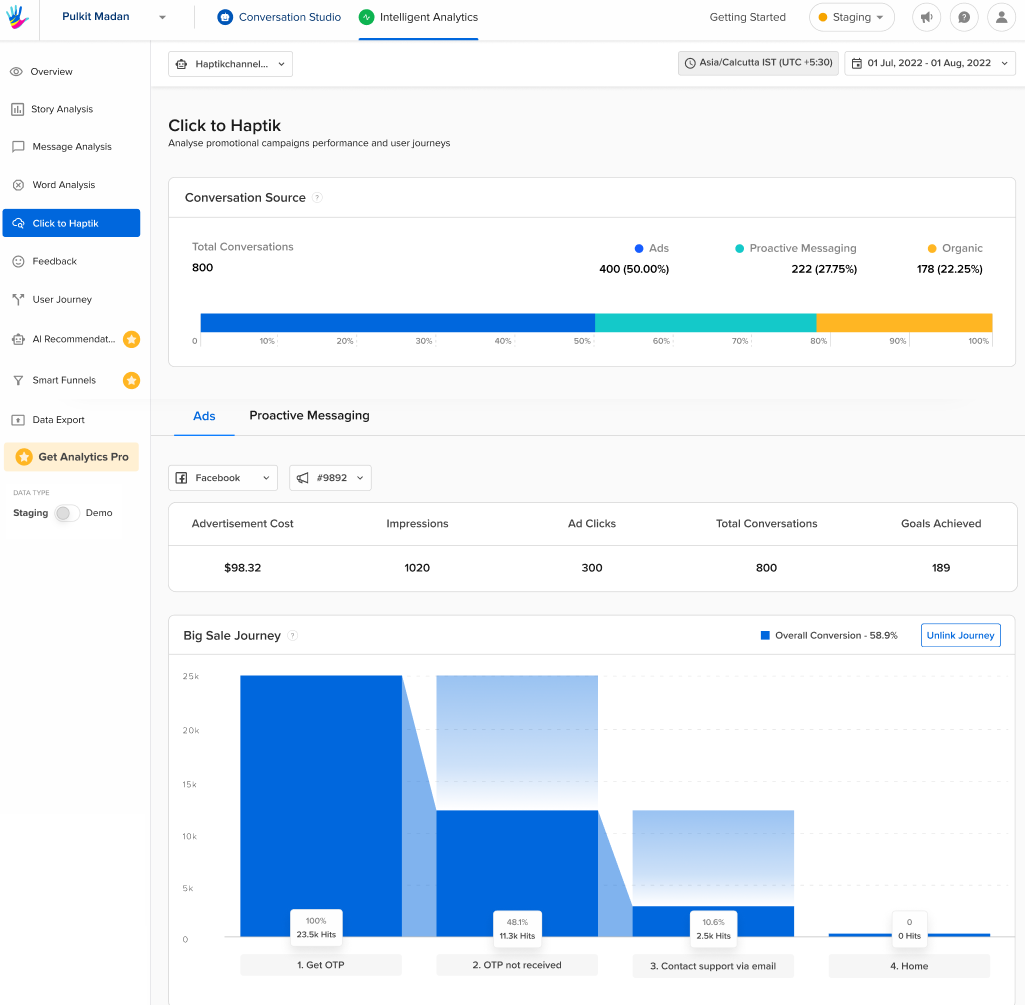
Ads Overview
This section gives an overview of returns on ad spends for the brand. Using the filters on this section, one can select the Ad platform and the Ad Id for which the user wishes to see the metrics.
- Advertisement Cost: Amount spent in running the selected ad for a selected time period
- Impressions: Number of times the ad entered a person’s screen
- Ad Clicks: Number of times users have clicked on the ad
- Total Conversations: Number of conversations initiated by the user by clicking on the ad
- Goals Achieved: Number of conversations which ended in the goal. To define a goal, link your ads with a user journey as below.
User Journey
Each Ad Id can be linked to an existing user journey (see how to create a user journey). On linking an Ad Id to the user journey, you can see how the users have threaded through the nodes of the journey after starting a conversation source from the selected Ad Id. This helps to understand the behavior of the users by providing details of the number of users completing the intended journey versus the users dropping off at each node/step.
Manual Analysis
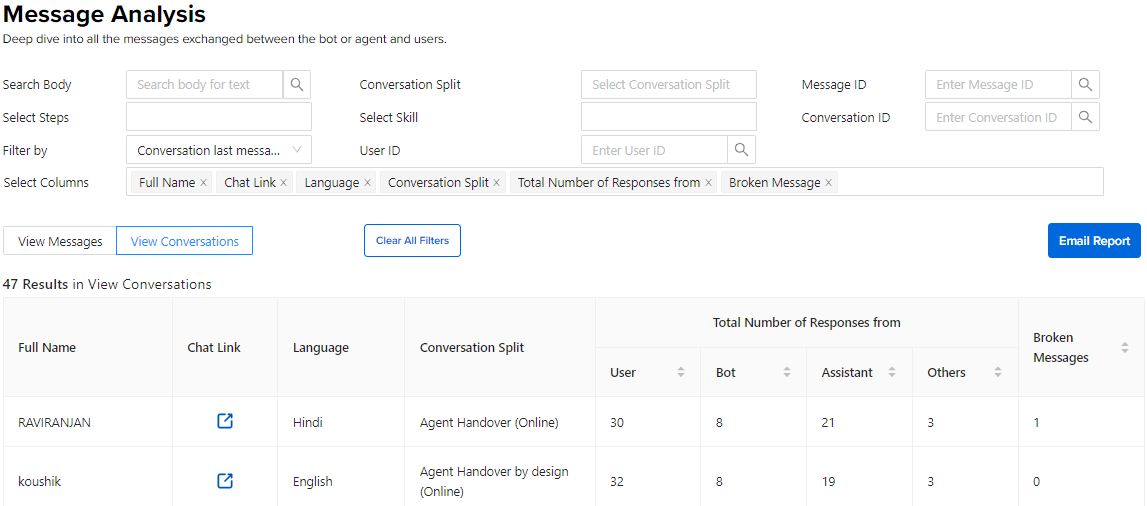
In Intelligent Analytics, you need to navigate to the Message Analysis, as shown. Here, you will be able to analyze the bot's performance on a message level. You can start by selecting a specific channel, and by setting the time period. And then you will see a page with options to filter and analyze the messages sent and received by your bot. The top half of the page consists of multiple filters. Click here to read more about Message Analysis.
Here, all you need to do is once you have selected the parameters as per your requirements, you can click on the Email Report button to receive a report of this analytics data in your email, as below.
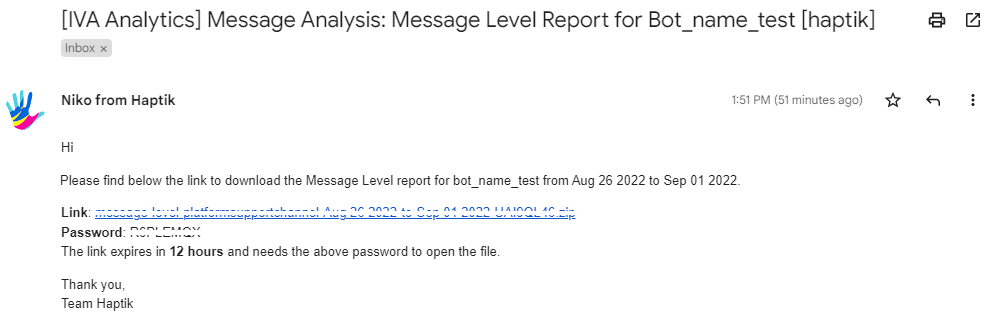
When you click on the link that is provided in the mail, a .zip file containing the analytics report will be downloaded. This .zip file contains an excel sheet(message analysis report). You will have to use the password provided in the mail to open it. Once you have opened it, you will be able to access the message-level analytics data, as shown. 
There are two fields in the above table that you need to focus on:
- Referral Source
- Referral Source Id
While analyzing the message-level data, make sure you check for this ['ad'] presence in the Referral Source column. What this means is, that the row that has an ['ad'] mentioned in the Referral Source Column is the one where a conversation was initiated through an Ad.
You can then check the Referral Source Id column, for the Ad Id. Since this feature is available on META, you can check this Ad Id with the Ads posted by you on Meta Commerce Manager. This way you will be able to navigate to the ad as well from which the user had started this conversation.
