How to Create a Commerce Plus Bot on WhatsApp for a Shopify Business

Written by Soham Amburle
Updated on February 3rd, 2023
- Getting Started
- Bot Building
- Smart Agent Chat
- Conversation Design
-
Developer Guides
Code Step Integration Static Step Integration Shopify Integration SETU Integration Exotel Integration CIBIL integration Freshdesk KMS Integration PayU Integration Zendesk Guide Integration Twilio Integration Razorpay Integration LeadSquared Integration USU(Unymira) Integration Helo(VivaConnect) Integration Salesforce KMS Integration Stripe Integration PayPal Integration CleverTap Integration Fynd Integration HubSpot Integration Magento Integration WooCommerce Integration Microsoft Dynamics 365 Integration
- Deployment
- External Agent Tool Setup
- Analytics & Reporting
- Notifications
- Commerce Plus
- Troubleshooting Guides
- Release Notes
Table of Contents
As a business, you are easily able to set up stores on various channels like Instagram and Facebook. But how can you effectively engage with your customers to answer their in-moment product queries or provide personalized product recommendations to users based on their preferences? Doing this would enable you to convert high-intent customers into purchasers, resulting in increased revenue opportunities.
In order to facilitate the above scenario, you can make use of Haptik's Commerce Plus bots. Commerce Plus bots allow you to convert every touchpoint in a user's purchase journey into a conversion opportunity by recommending highly personalized products as part of a conversation with the user, while also answering their in-moment product queries. This is achievable across channels like Instagram, Facebook, WhatsApp, and others.
And guess what else? If you already are a merchant on Shopify, you can use your existing Product catalog content from your Shopify store to launch your Commerce Plus bot on various channels. Isn't that great?
Prerequisites for integrating Commerce Plus bot on WhatsApp for a Shopify business
- An existing business on Shopify with a catalog and inventory set up.
- To activate the WhatsApp bot linked to an account, you need to authorize Haptik as a BSP to create/manage your Meta account.
Steps for building a Commerce Plus bot on WhatsApp for a Shopify business
The steps to build a Commerce Plus bot are divided into different sections:
- Link your Shopify Data Resource with Haptik
- Add your Shopify catalog to your Meta Commerce Manager
- Set up Shopify Product Catalog on Whatsapp Business Account
- Create a Commerce Plus bot on Haptik
- Deploy the Commerce Plus bot on WhatsApp
1. Link your Shopify Data Resource with Haptik
Catalog Access
In order to make your Shopify catalog available to the Commerce Plus bot, Haptik uses its Catalog integration process to synchronize the catalog. This is a one-time setup that takes care of ingesting all your products from Shopify to the Commerce Plus bot and thereafter updating the product information on a regular basis with changes on the Shopify catalog.
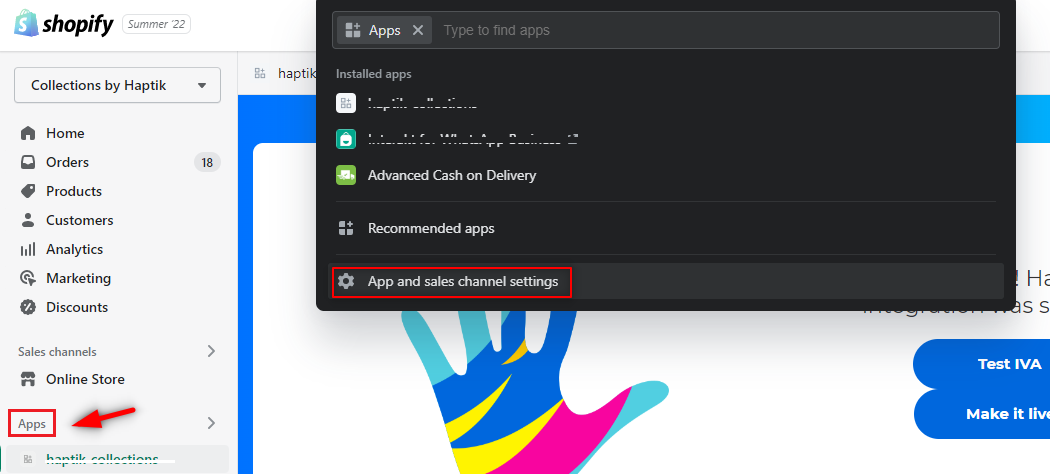
Step 1: In order to link your Shopify Data Resource with Haptik, you need to navigate to your Shopify Store Admin Page, and click on Apps and select App and sales channel settings, as shown.
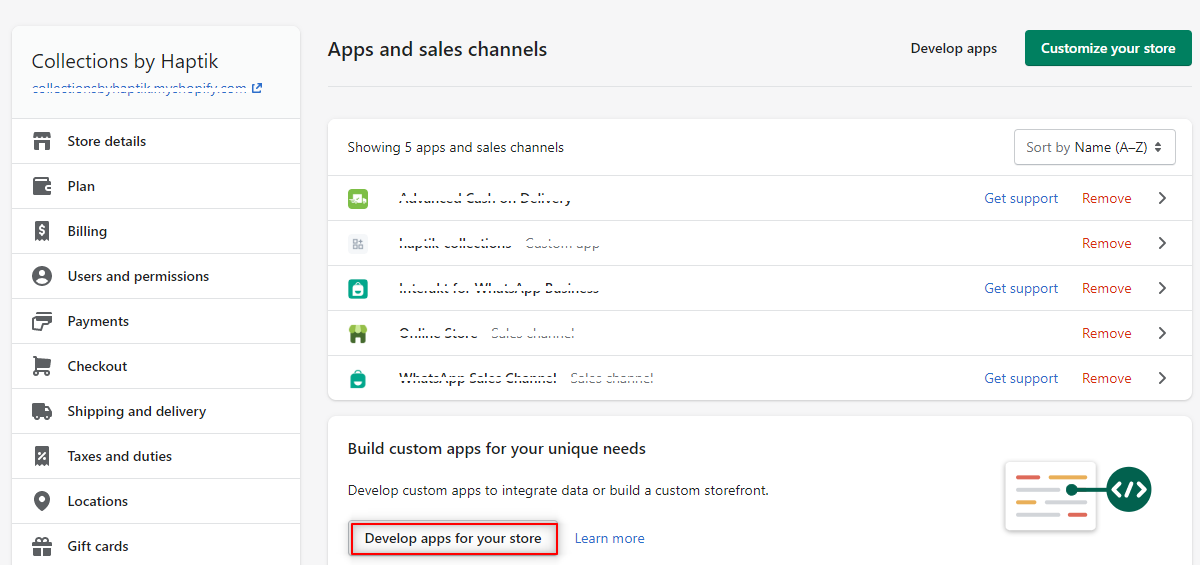
Step 2: Under Apps and sales channels, you need to select Develop apps for your store, as shown.
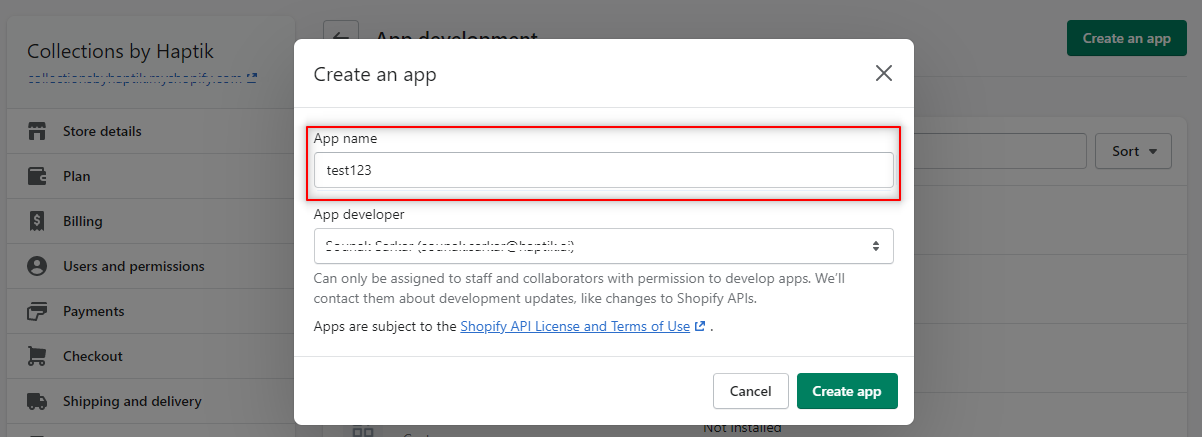
Step 3: In App Development, you need to click on Create an app button, as shown.

Step 4: Now, you need to add an App name, and click on Create app button, as shown.
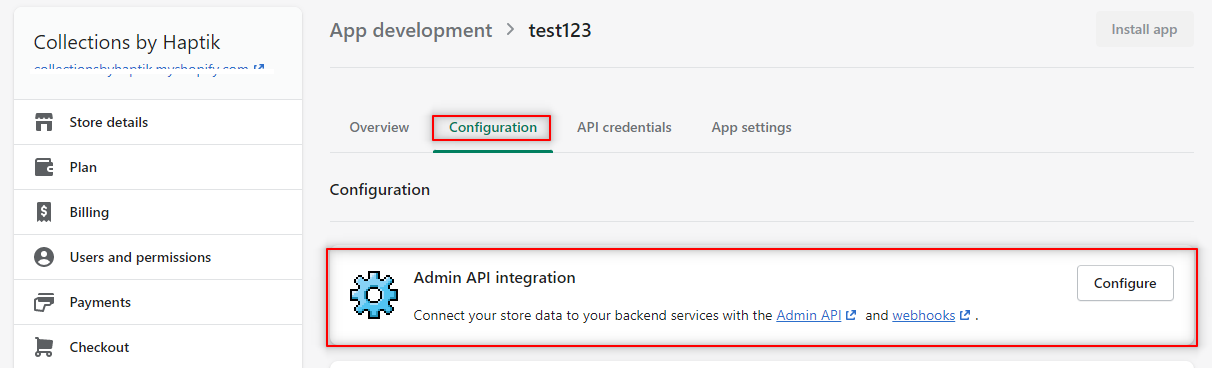
Step 5: Next, move to Configurations section and select Admin API Integration and click on Configure button, as shown.
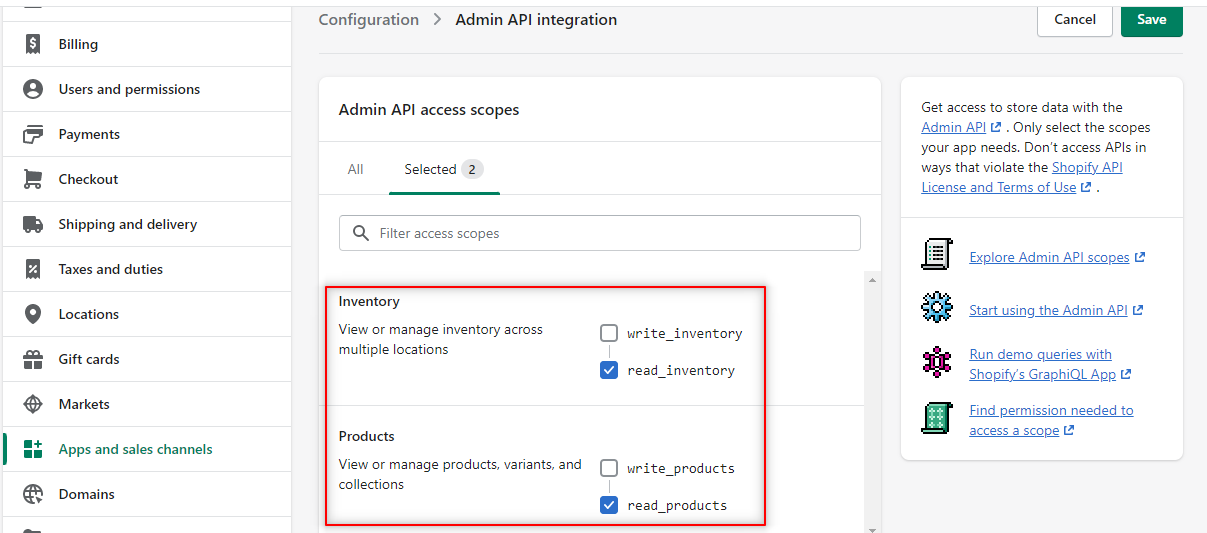
Step 6: Now you will have to add access scopes under Admin API access scopes, and click on the Save button as shown, as shown. Here, you need to add the following two access scopes:
- read_products under Products.
- read_inventory under Inventory.
Step 7: Once you have saved the configuration, you can click on the Install button, as shown.

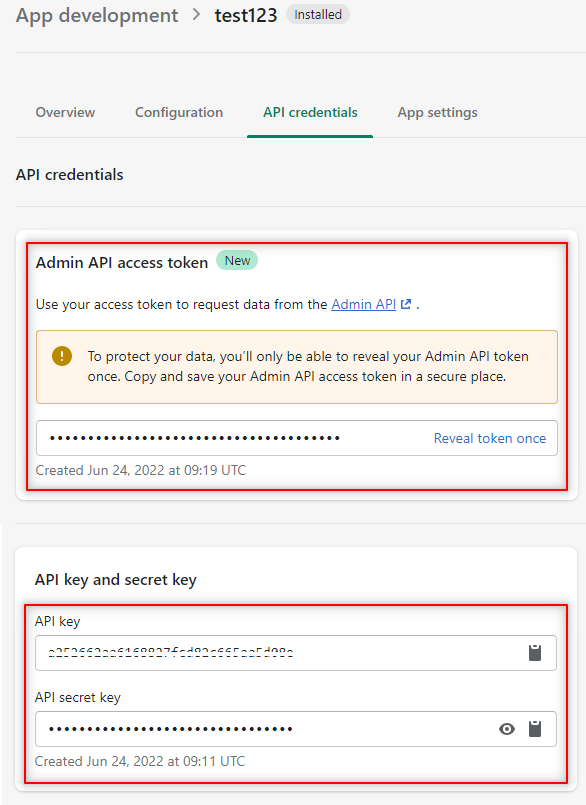
Step 8: Once the App is installed, you have to copy these three values from the API Credentials tab, and share them with Haptik:
- Admin API Access Token
- API Key
- API Secret key
Step 9: You would need to share the Shopify Domain Name with your Haptik SPOC. Shopify Domain name can also be found in the page source of the website we are targeting.
You can send these credentials to your Haptik SPOC which will help them complete the catalog integration for fetching the product catalog from your Shopify account.
Order Management
In order to track and manage conversions from Haptik's commerce bot, we need storefront API tokens. Follow the below steps to get the same.
- In the newly installed custom Haptik app’s settings, go to Configuration > Storefront API integration and click Edit.

- Give the following permissions under Products and Checkout, and click Save.
- Unauthenticated_read_checkouts
- Unauthenticated_read_product_listings
- Unauthenticated_read_product_inventory
- Unauthenticated_read_product_pickup_locations
- Unauthenticated_read_product_tags

- Get the Storefront API access token from the API credentials section and share it with Haptik SPOC.

2. Add your Shopify catalog to your Meta Commerce Manager
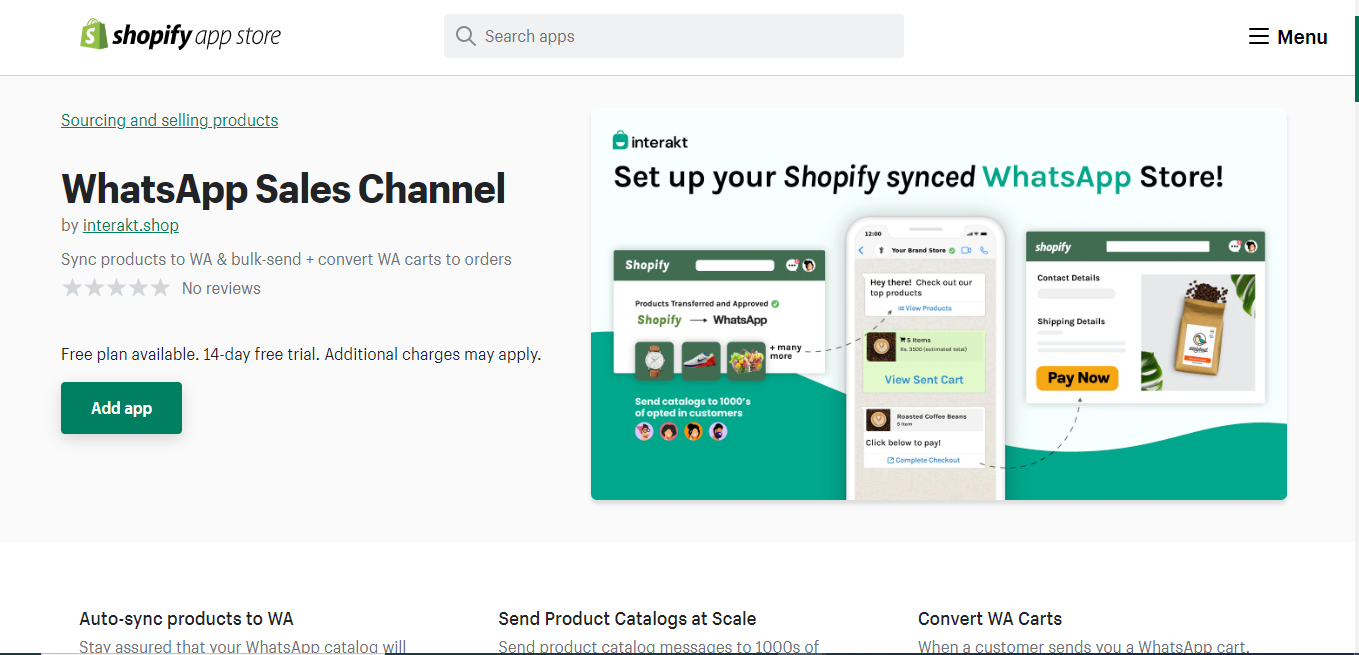
In order to support and render Product List Messages on WhatsApp, Haptik recommends using Interakt's WhatsApp Sales Channel app as a connector between your Shopify store and Meta Commerce Manager catalog. Before you start, please make sure you create an account on Interakt.
If you are not using Interakt or you have an existing account on Interakt, please reach out to your Haptik SPOC to help you with further steps.
To add the Shopify catalog, you need to follow the below-mentioned steps.
Step 1: Navigate to Commerce Settings, under Interakt.
Step 2: Next, click on Install Sales Channel.

In case, you have already connected another catalog to your Interakt account, please disconnect that catalog from your Interakt account. Also, if that catalog is connected to your WhatsApp Business Account, make sure you have disconnected it from there as well.
Step 3: This will open the WhatsApp Sales Channel app on the Shopify app store, where you need to click on the Add App button, as shown.
Step 4: Next, you need to click on the Add Sales Channel on Shopify.

Step 5: You might be required to fill in your Business Address and Compliance Info in case you are using a +91 WhatsApp Number for your WhatsApp account. But in case, you have already filled these details on Interakt earlier, you won’t be required to do this.
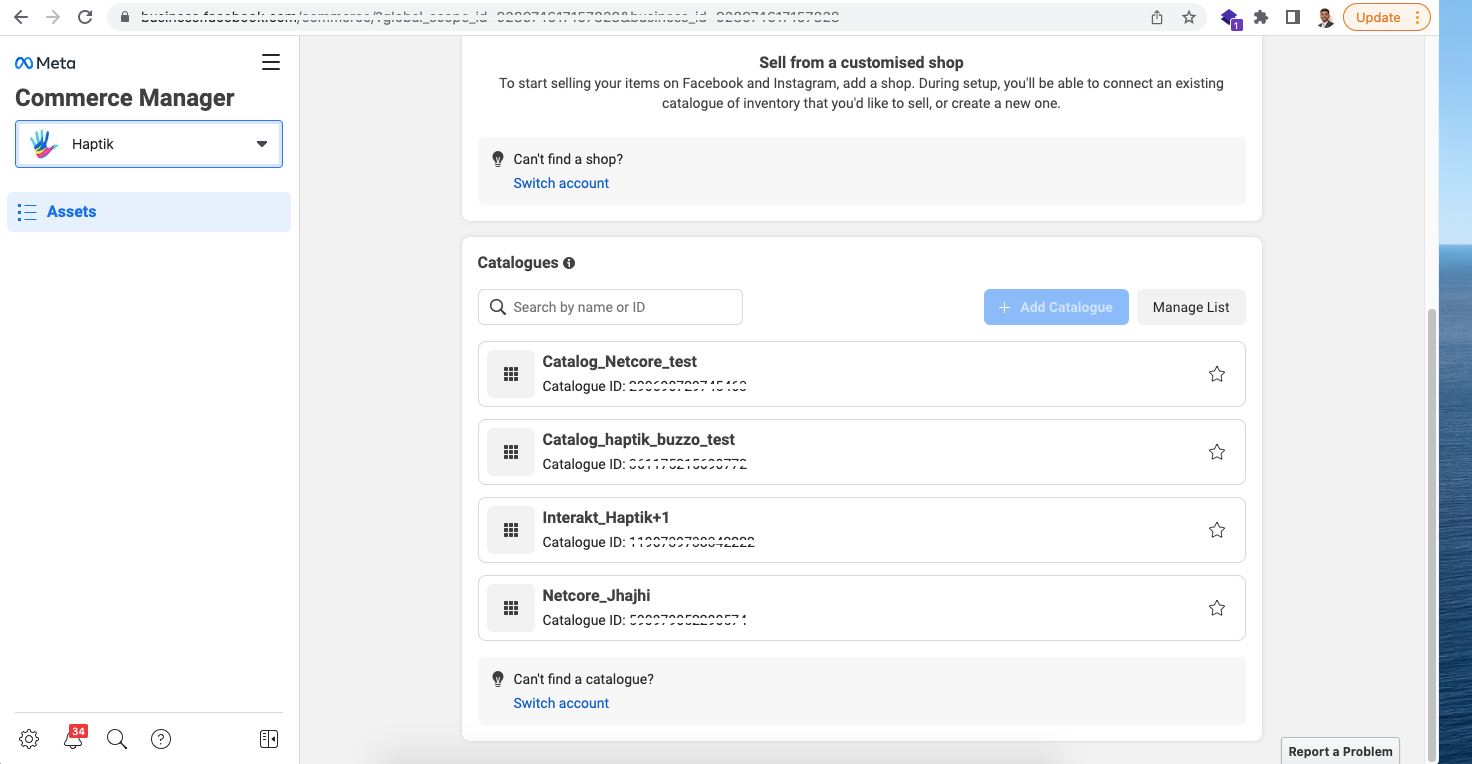
Step 6: Your Shopify products will immediately start syncing with your Meta Commerce Manager account into a new catalog named Interakt_<OrgName>. You will have to wait for up to 30 minutes in order to see all products.
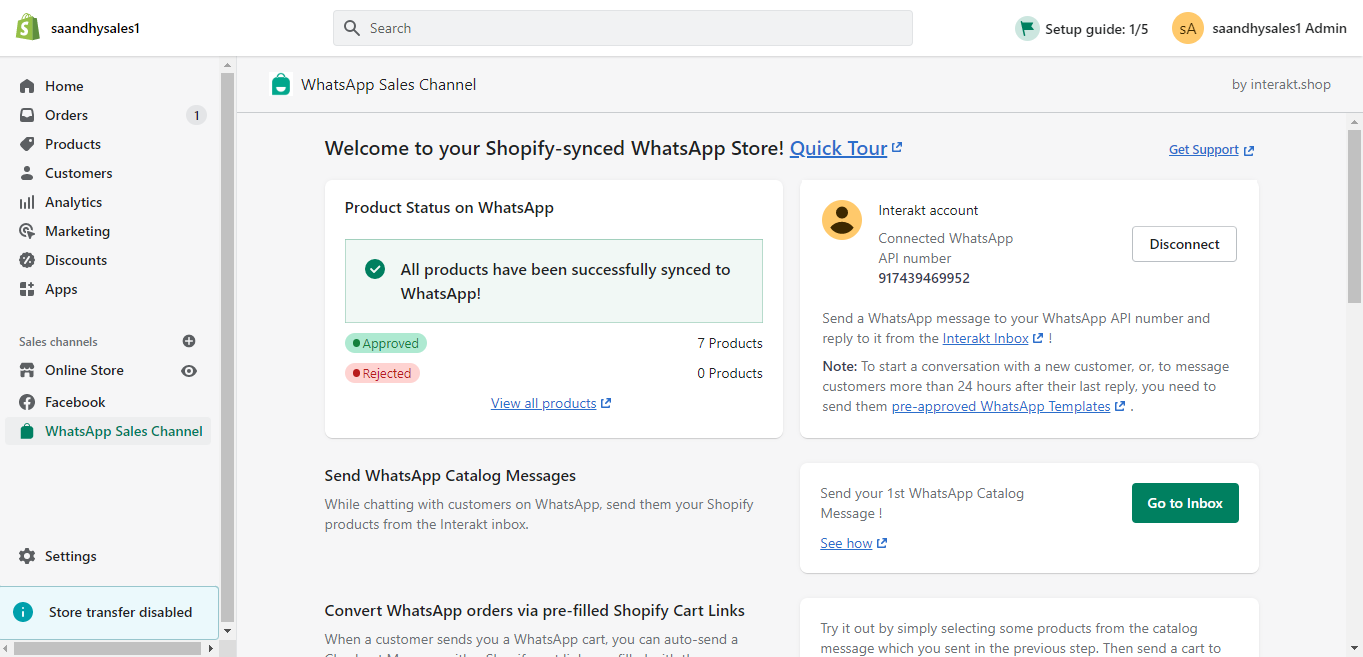
Below is the screenshot of how it will appear on Meta Commerce Manager. You can click on the catalog to see the products synced.
Once your products have synced properly, you can move to set up your Shopify Product Catalog on your WhatsApp Business Account.
3. Set up your Shopify Product Catalog on your WhatsApp Business Account
Once you are done setting up your Shopify Product Catalog on Meta Commerce Manager, you set up your Shopify Product Catalog on your WhatsApp Business Account.
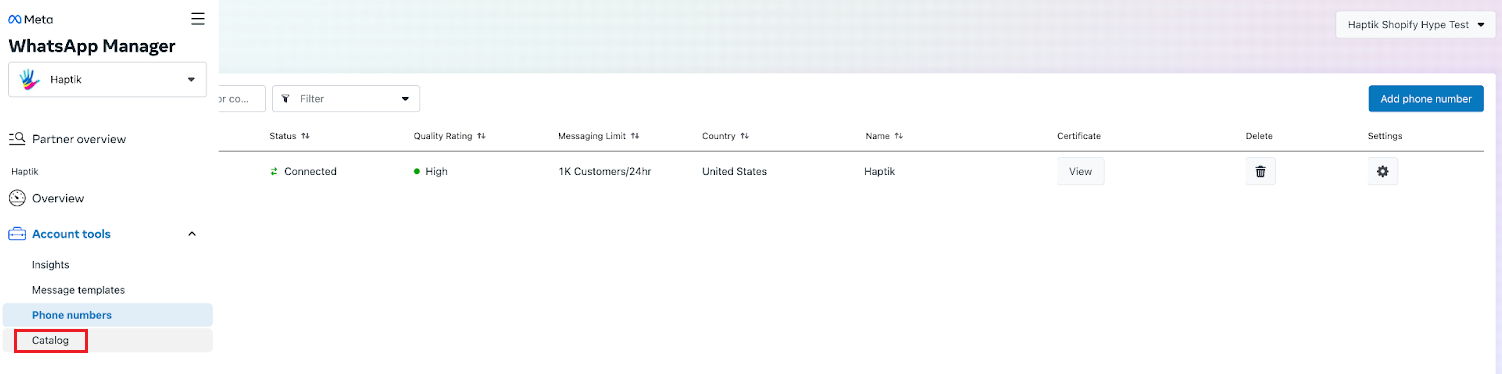
Step 1: You will have to navigate to your WhatsApp Business Account and select the number you wish to connect to your catalog to, as shown.
Step 2: Using the left navigation pane, select Catalog, as shown.
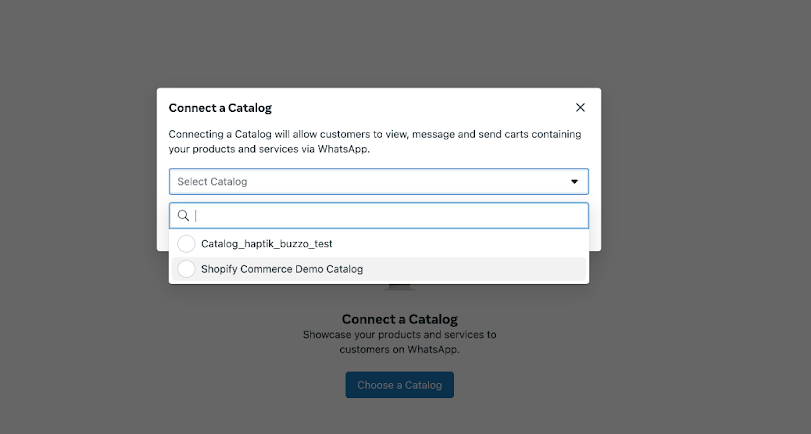
Step 3: Next, you will have to click on Choose a Catalog, as shown.

Step 4: Here, you will have to select the catalog that you had created in your Meta Commerce Manager account previously, and click on “connect catalog” as shown.
Step 5: Once your catalog is successfully connected, you will be able to see a confirmation screen, as shown.
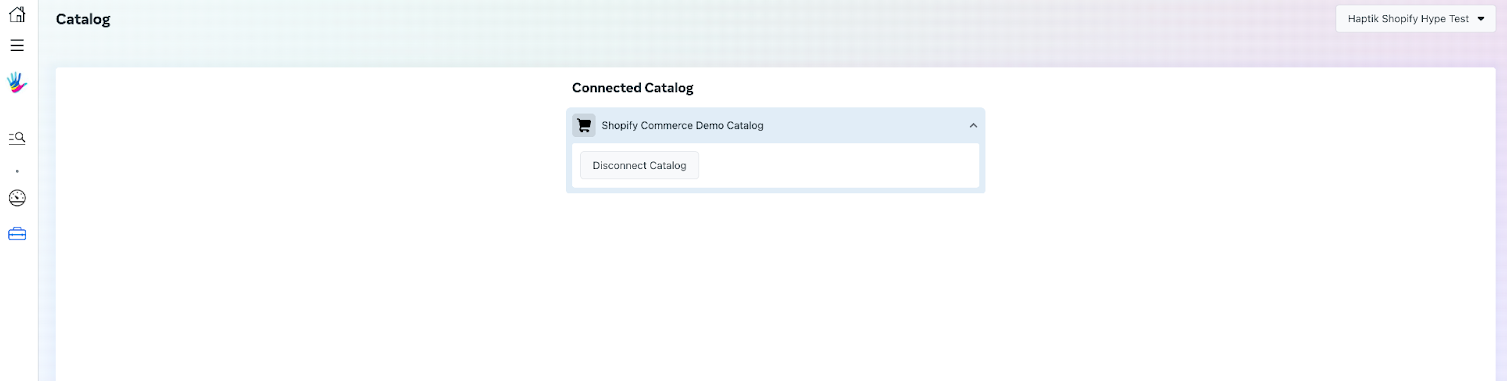
Once you’ve completed these steps, you’re all done with setting up your Shopify Product Catalog on your WhatsApp Business Account!
Next, you can move to Create a Commerce Plus bot on Haptik.
4. Create a Commerce Plus bot on Haptik
To create a Commerce Plus bot based on your Product Catalog on Shopify, you will have to reach out to your Haptik SPOC who would assist you with the steps required for creating a Commerce Plus bot.
You would start with creating a basic bot on Haptik. You can learn more about creating a bot on Haptik, here. You will have to add Recommend a Product Smart Skill to your bot. You can learn more about Recommend a Product Smart Skill, here.
Once you have created a bot on Haptik, please reach out to your Haptik SPOC to add Commerce Plus functionality to your bot.
Note:
If you've chosen Haptik to set up your Meta Catalog, then all the steps in the Sections 2 and 3 will be taken care of by Haptik directly, and if you've set up your own Meta Account, then make sure you provide its access to your Haptik SPOC.
5. Deploy your Commerce Plus bot on WhatsApp
Now that all the setup steps are complete and the bot is also ready, you can deploy your Commerce Plus bot on WhatsApp. You can learn more about it here. Your Haptik SPOC will help you in taking your Commerce Plus bot live on WhatsApp.
The above-mentioned steps will ensure you have a robust and responsive bot on Commerce Plus that automatically fetches details from your catalog as and when there are product updates in your catalog, delivering the best conversational experience to your customers.
You can check the below video to see the Commerce Plus bot on WhatsApp for Shopify Business in action.
How does the Product catalog get updated on the bot?
For this, we use webhooks for updating the product catalogs in near-real-time. So, whenever any updates are made on Shopify, we shall have the updated catalog data on the bot.
