What is Salesforce Integration? How to set up Haptik and Salesforce Integration?

Written by Medha Anand
Updated on August 26th, 2022
- Getting Started
- Bot Building
- Smart Agent Chat
- Conversation Design
-
Developer Guides
Code Step Integration Static Step Integration Shopify Integration SETU Integration Exotel Integration CIBIL integration Freshdesk KMS Integration PayU Integration Zendesk Guide Integration Twilio Integration Razorpay Integration LeadSquared Integration USU(Unymira) Integration Helo(VivaConnect) Integration Salesforce KMS Integration Stripe Integration PayPal Integration CleverTap Integration Fynd Integration HubSpot Integration Magento Integration WooCommerce Integration Microsoft Dynamics 365 Integration
- Deployment
- External Agent Tool Setup
- Analytics & Reporting
- Notifications
- Commerce Plus
- Troubleshooting Guides
- Release Notes
Table of Contents
Prerequisites for having a bot with Salesforce integrationHow to set up Salesforce + Haptik Integration?1. Setting up Live Agent on salesforce2. Adding deployment details on Haptik3. Setting up Webhooks4. Configuring Chat with an Agent on Haptik BotSalesforce is a prime choice for most businesses to handle their CRM, manage data, and many more activities. Customers who use Salesforce Service Cloud for providing support can leverage Haptik IVA’s integration with Salesforce products to provide a unified automated support experience in one interface.
Click here, to know more about the features Salesforce Service Cloud has to offer.
Prerequisites for having a bot with Salesforce integration
Following are the prerequisites:
- A bot on Haptik. You can read this article to build your own bot.
- A registered account on Salesforce Service Cloud. You can check the pricing, here.
How to set up Salesforce + Haptik Integration?
The steps for Setup are divided into different sections.
- Setting up Live Agent on salesforce.
- Adding details in the Configure Salesforce Service Cloud section on Haptik.
- Setting up Webhooks.
- Configuring Chat with an Agent on Haptik Bot.
1. Setting up Live Agent on salesforce
Step 1: Navigate to Salesforce Service Cloud here, and log in using your registered credentials.
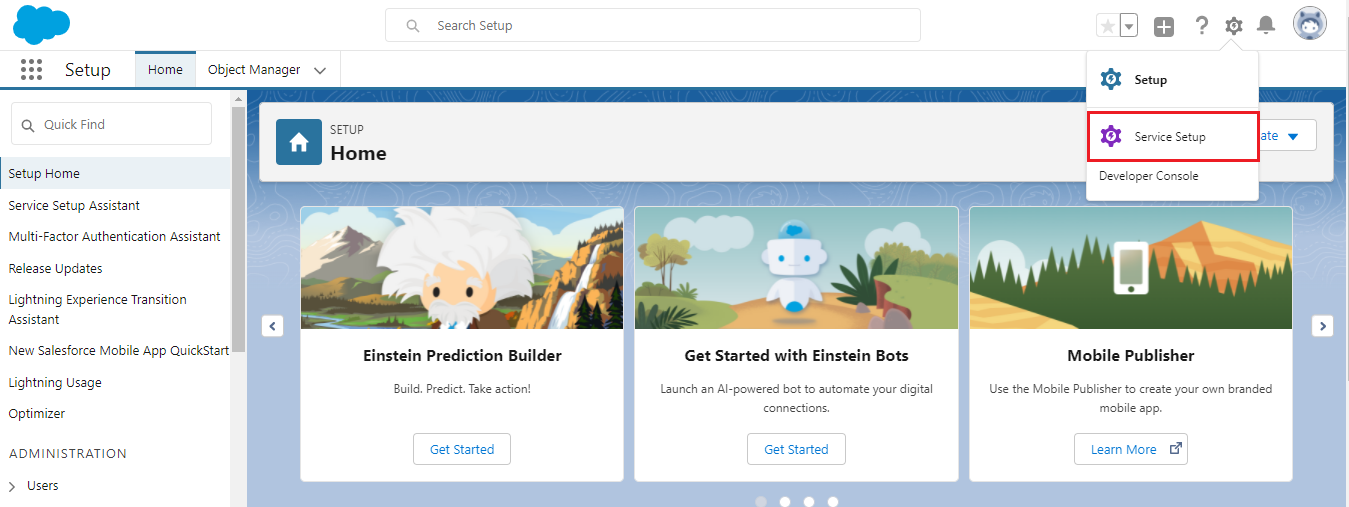
Step 2: Next, you will have to open the Service Setup page. Navigate to settings, and select Service Setup, as shown.
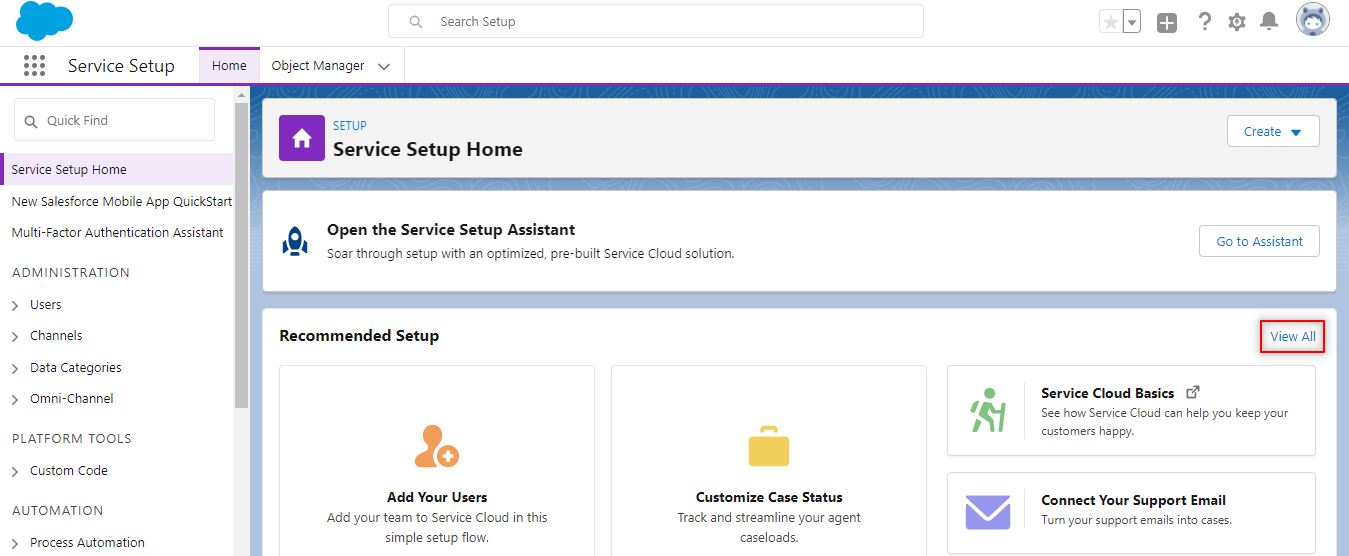
Step 3: Once you are on the Service Setup page, you will have to create a Queue, and for that click on View All, as shown.
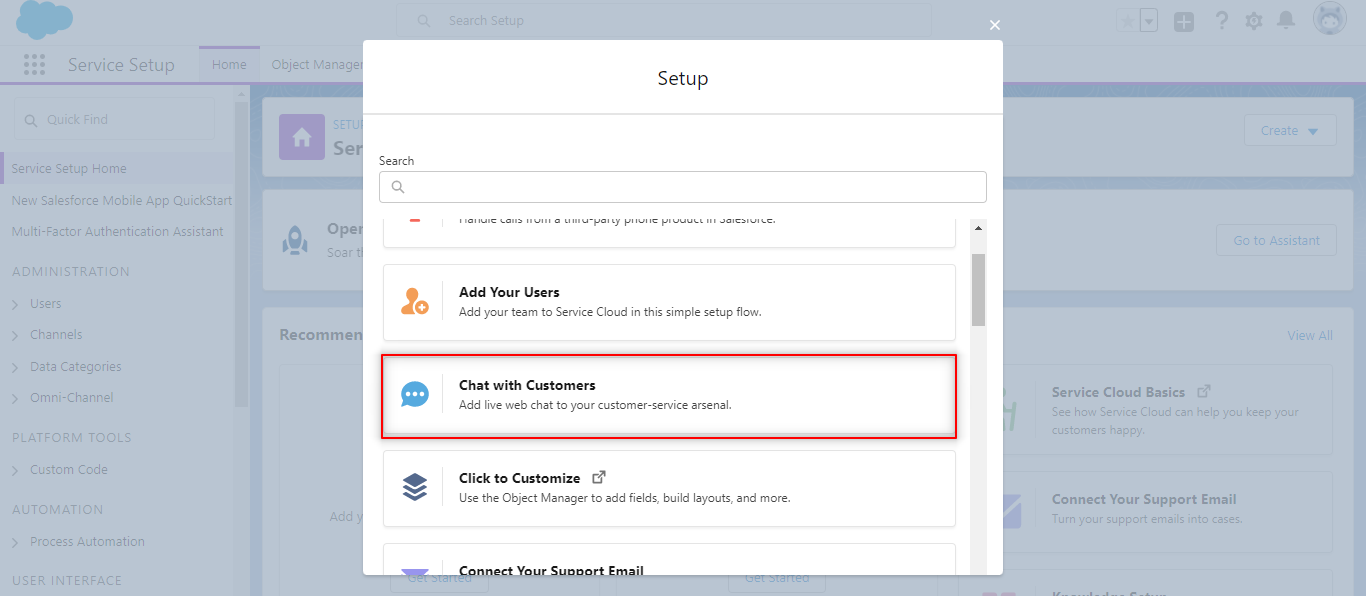
Step 4: On clicking View All, a pop-up will open, wherein you have to select the Chat with Customers option, as shown.
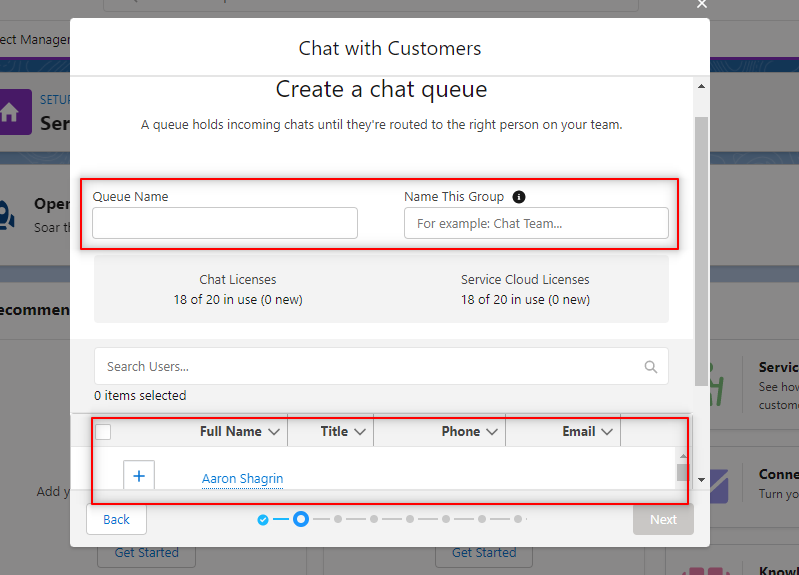
Step 5: Here, you will have to assign Queue Name, Group Name, and add users(agents), as shown.
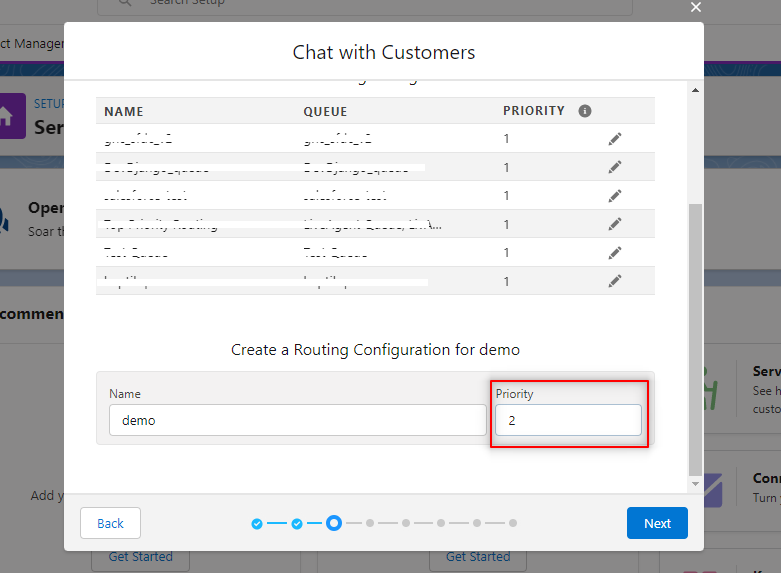
Step 6: Assign Priority to your Queue, as shown.
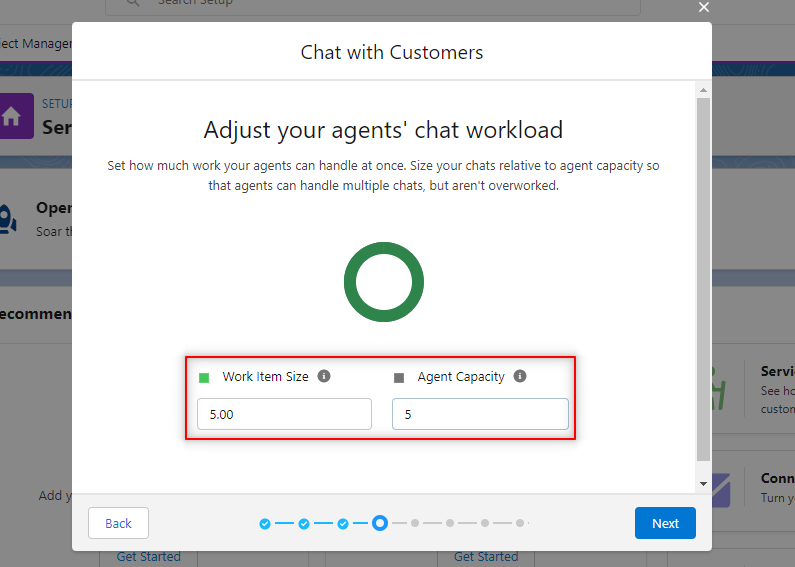
Step 7: Add Work Item size and Agent Capacity. Work Item Size will determine the total number of chats this queue can handle at a time, whereas the Agent Capacity will determine the total number of chats an agent can handle at a time
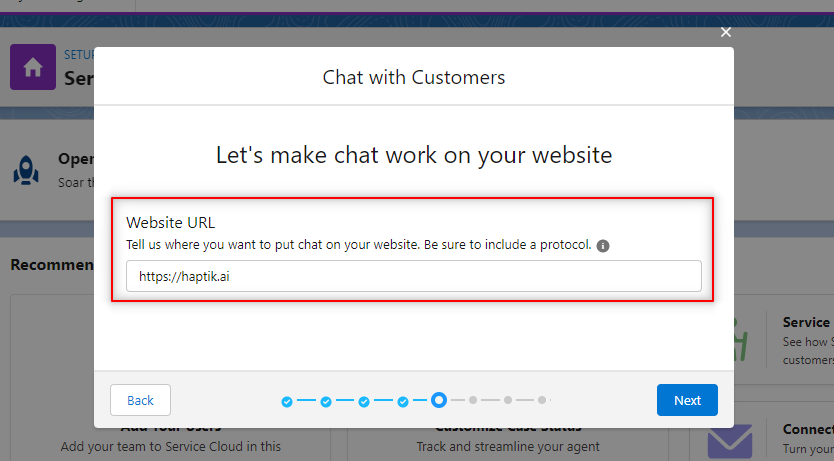
Step 8: Add the URL in the Website URL field, wherein the bot will be deployed.
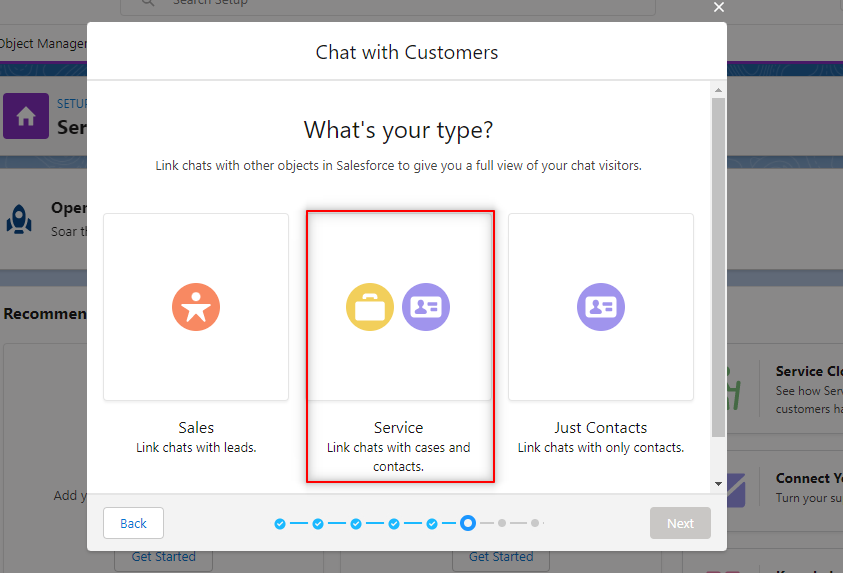
Step 9: Select the Type as Service.
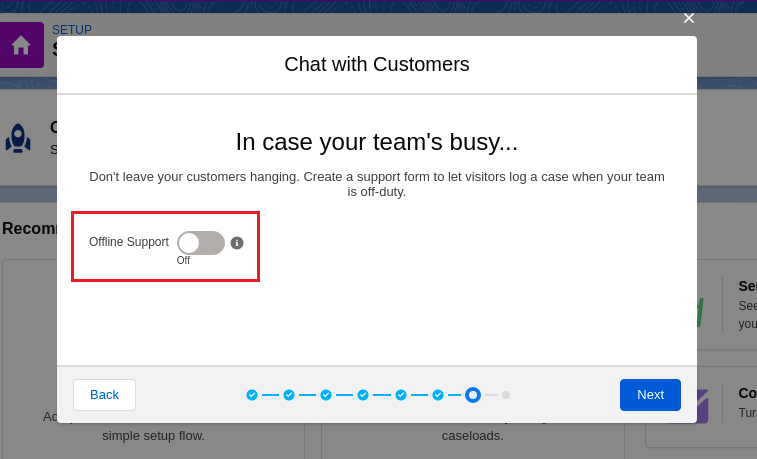
Step 10: Here, make sure you keep the offline support toggle OFF. Click on Next and your Queue setup will be finished. It will throw up a pop-up with a script to do an integration. You can skip that since Haptik has it handled at the backend.
At this stage, your Setup with Salesforce is complete, and now you can move to the next section which is Adding deployment details on Haptik.
2. Adding details in the Configure Salesforce Service Cloud section on Haptik
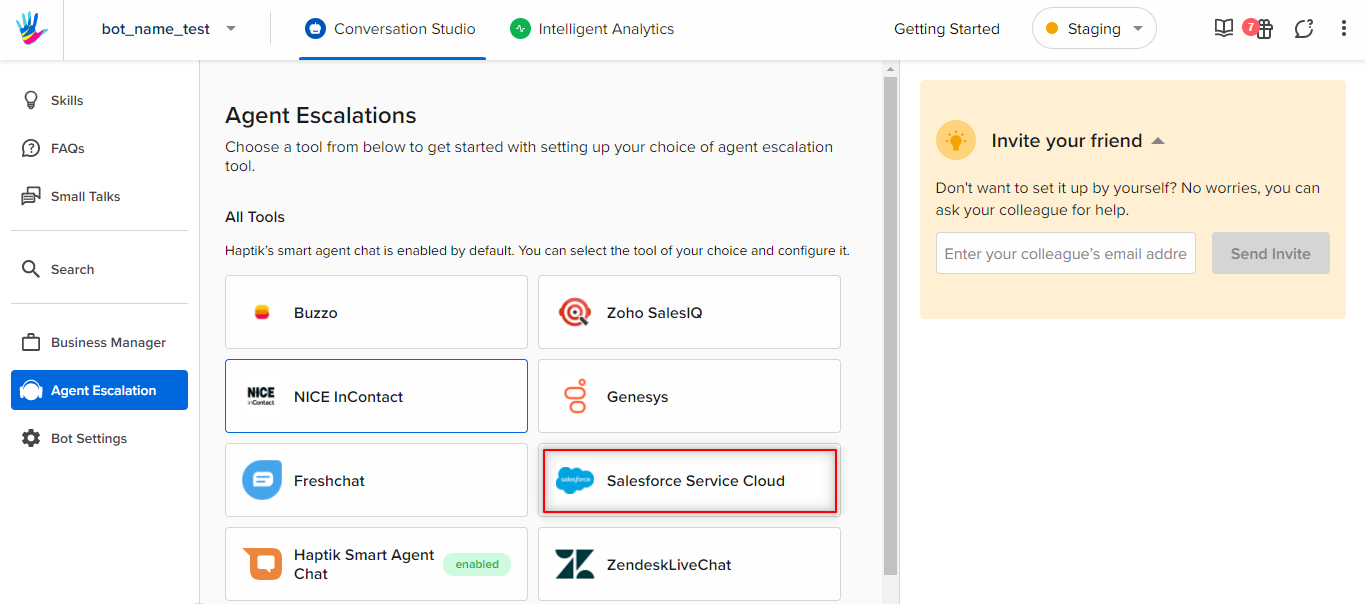
Step 1: Since you have created a bot on Haptik, navigate to your bot and select Agent Escalations > Salesforce Service Cloud, as shown.
Step 2: Here, you will have to populate all these fields under Configure Salesforce Service Cloud section.
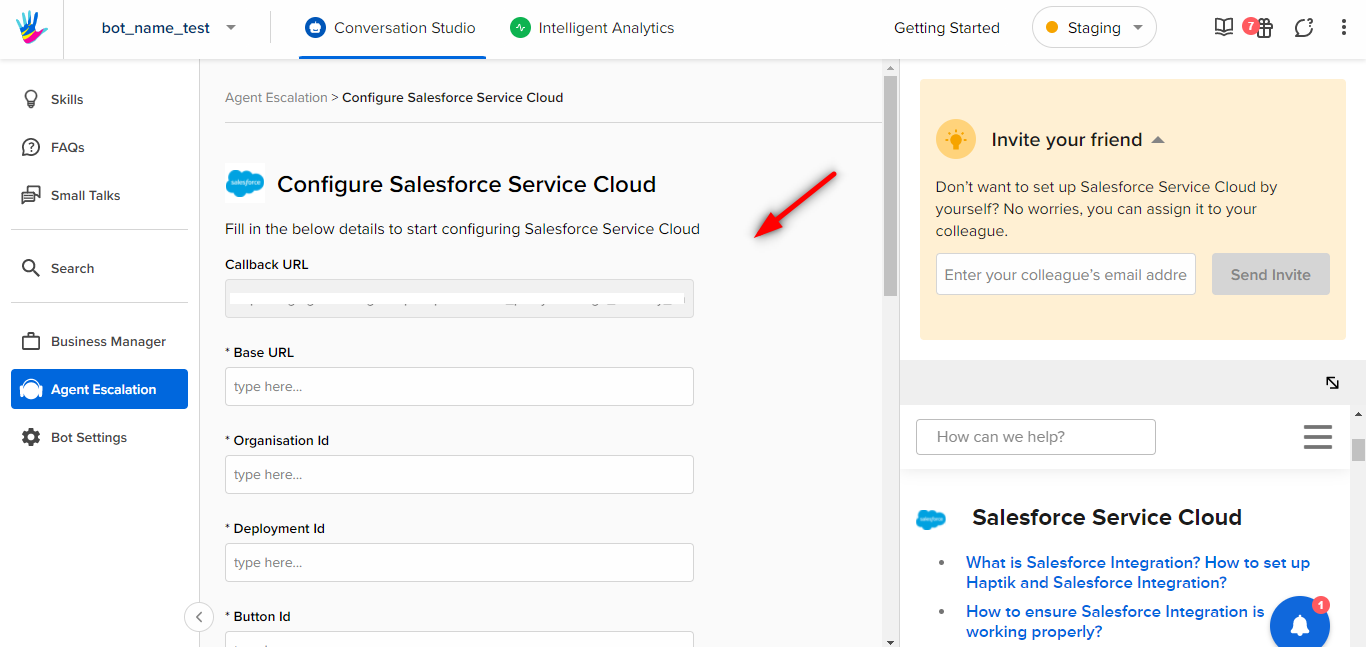
Step 3: In order to acquire the fields mentioned in the above image, you will have to navigate to the Service Setup page of Salesforce Service Cloud.
-
Base URL: Search for Chat Settings in Quick Find on the LHS, and select the Chat API Endpoint. Add this in the Base URL field on Haptik Example: “https://d.la2-c2-aa5.salesforceliveagent.com” We just need the Base URL till the .com part.

-
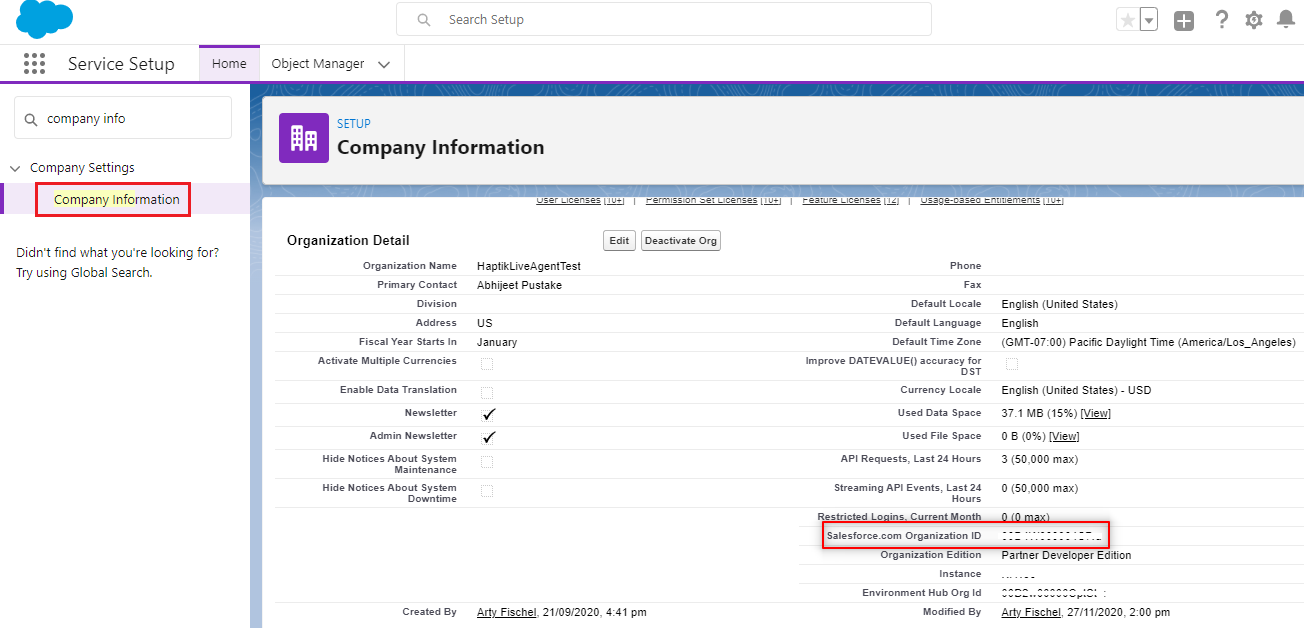
Organization Id: Search for Company Information, copy the Salesforce.com Organization ID, and paste it under the Organization Id field on Haptik.
-
Deployment Id: Search for Deployments, and click on the deployment that you have given your user(agent) access to. The Deployment Id will be available in the script, as shown. (There will be two Ids in the script. One will be the Organization Id that we have already used, and the other one will be the Deployment Id). Copy the Deployment Id, and paste it into the Deployment Id field on Haptik.
If you do not remember it, you can navigate to Users > Select a User to edit > Scroll down to Permission Set Assignment. Here you will be able to see the list of allowed deployments.x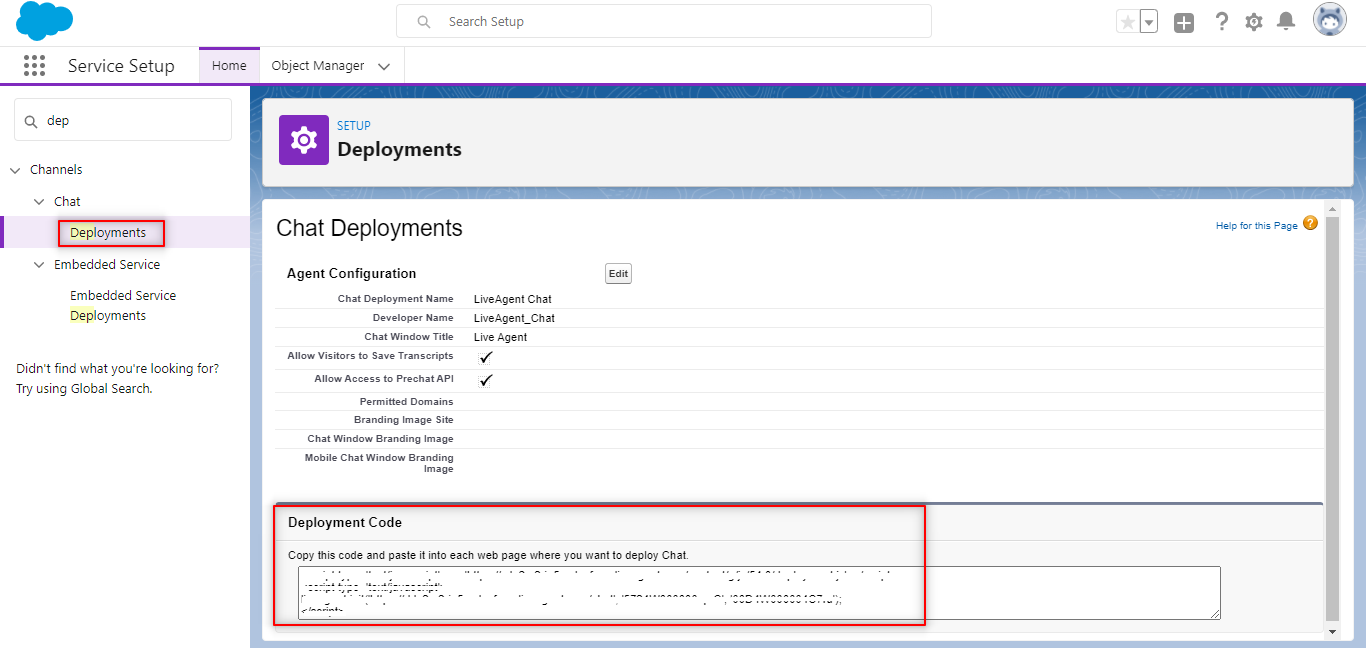
-
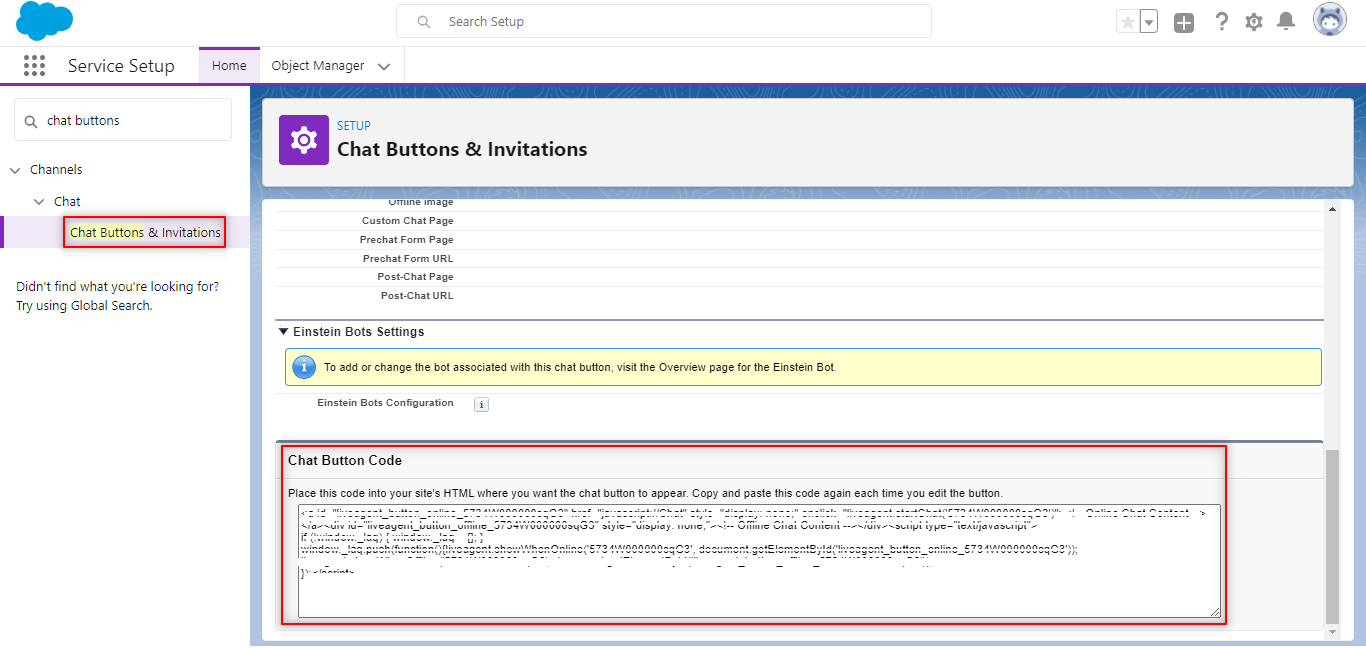
Button Id: Search for Chat Buttons and Invitations, and select the group name. Scroll down to Chat Button Code, and copy the alphanumeric code present beside liveagent_button_online in the script. Now, paste this in the Button Id field on Haptik.
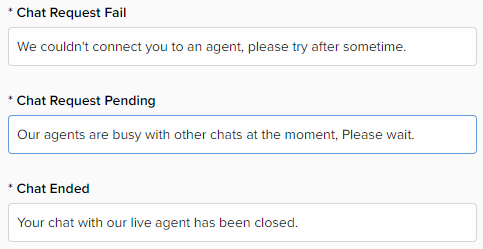
- For the following fields on Haptik, you can add messages as shown.
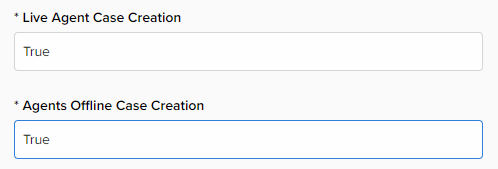
- For Live Agent Case Creation and Agents Offline Case Creation fields, add the value True in the text field, and save the configuration.
Once you have added all the above fields, you are done with the configuration on Haptik, and now you can move to the next section which is Setting up Webhooks.
3. Setting up Webhooks
In order to set up Webhooks, contact your Haptik SPOC, and they will help you with this section.
4. Configuring Chat with an Agent on Haptik Bot
You need to configure the Code Step in your bot, which will enable the transfer of the chat from the bot to an agent when the user requests to chat with an agent.
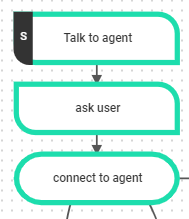
Step 1: Here, along with the user journies you have built on your bot, you will have to create a Static Step, and connect it to a Code Step, as shown.
Step 2: Copy and paste the following code in the Code Step, for the scenarios mentioned below.
A. Transfer Chat from Haptik to Salesforce.
import  json
import requests
def main(event, context):
    body = json.loads(event['body'])
    entities = body.get('entities')
    user_data = body.get('user')
    conversation_details = body.get('conversation_details')
    user_details = body.get("user_details")
    env_variables = body.get("env_variables")

    final_response = connect_chat_to_agent()
    print("Final Response ", final_response)
    response = {'statusCode': 200, 'body': json.dumps(final_response), 'headers': {'Content-Type': 'application/json'}}
    return response

def connect_chat_to_agent():
    """
        Transfers chat to an agent in salesforce
    """
    final_response = {
        'callback_ops': {
            'tract_atc': {
                'receiver': 'message_delivery_salesforce'
            }
        }
    }
    return final_response
What this code does is, it changes the receiver thread from Haptik to Salesforce. So, whenever you need to transfer the control to a live agent on Salesforce you can simply change the final_response of the code as done in the above function.
B. Create Cases on Salesforce
If you want to create cases(tickets) in Salesforce, then you can change the connect_chat_to_agent as follows:
def connect_chat_to_agent(user_detials, user_name, phone_number, email):
    """
        Transfers chat to an agent in salesforce
    """
    user_details['case|Subject|subject|online'] = 'Case created as chat is transferred to agent'
    user_details['case|Description|description|online'] = 'A new chat is created for the user'
    user_details['case|Subject|subject|offline'] = 'Case is created as all agents are offline'
    user_details['case|Description|description|offline'] = 'Offline case creation testing.'
    user_details['contact|FirstName|FirstName|match'] = "Guest"
    user_details['contact|LastName|LastName|match'] = "User"
    user_details['contact|Email|Email|match'] = "guest@haptik.co"
    final_response = {
        'status': "Chat now",
        'user_details': user_details,
        'callback_ops': {
            'tract_atc': {
                'receiver': 'message_delivery_salesforce'
            }
        }
    }
    return final_response
What this function does is, when a case has to be created on Message Delivery, it fetches these details from the user_details table and calls the Salesforce API to create the case.
Example: If a case arises where Message Delivery gets to know that all agents are offline, and it has to create a Case for it. So, it will simply search the user_details table for the data that needs to be populated, which is the subject and description, and it will create a Case on the basis of this data. So case|Subject|subject|offline will become the subject for the Case, and case|Description|description|offline will become the description.
So for Case creation, you need to provide two details, one is the subject, and the other one is the description, which you can provide in the user_details by using the following format.
Syntax will be:
case|Subject|subject|online for online subject
case|Description|description|online for online description
case|Subject|subject|offline for offline subject
case|Description|description|offline for offline description
C. Passing Specific Button Id
On the middleware whenever a payload is received from the bot. The middleware first checks whether we have specified the button_id into the user_details dictionary, and if there is one mentioned, then it will take that button_id, or else it will take the default button_id provided into the Agent Escalation Salesforce setup.
In order to pass button id into user_details, you can use the Code Step. You simply have to add the “chat_button” key to your user_details and send the user_details into the final response.
def connect_chat_to_agent(user_detials, user_name, phone_number, email):
    """
        Transfers chat to an agent in salesforce
    """
    user_details['chat_button’] = “<button_id>”
    final_response = {
        'user_details': user_details,
        'callback_ops': {
            'tract_atc': {
                'receiver': 'message_delivery_salesforce'
            }
        }
    }
    return final_response
Once you have followed all the above steps, you are done with the integration, and now you can test your bot to check its behavior, and if everything is working as expected. You can check this article, which will give you an understanding of how this integration actually works when a user requests to chat with an agent.
