How to Set up Sunshine Conversation Integration

Written by Medha Anand
Updated on March 30th, 2023
- Getting Started
- Bot Building
- Smart Agent Chat
- Conversation Design
-
Developer Guides
Code Step Integration Static Step Integration Shopify Integration SETU Integration Exotel Integration CIBIL integration Freshdesk KMS Integration PayU Integration Zendesk Guide Integration Twilio Integration Razorpay Integration LeadSquared Integration USU(Unymira) Integration Helo(VivaConnect) Integration Salesforce KMS Integration Stripe Integration PayPal Integration CleverTap Integration Fynd Integration HubSpot Integration Magento Integration WooCommerce Integration Microsoft Dynamics 365 Integration
- Deployment
- External Agent Tool Setup
- Analytics & Reporting
- Notifications
- Commerce Plus
- Troubleshooting Guides
- Release Notes
Table of Contents
Overview
Zendesk is a service-first CRM company that builds software designed to improve customer relationships. The software is powerful and flexible and scales to meet the needs of any business.
The Zendesk Messaging Bot Partner Program is a new initiative at Zendesk to help businesses deliver bot integrations into Zendesk Suite. Any business opting for the program will have their integration listed on Sunshine Conversations Marketplace as part of the Switchboard API launch. Leveraging Zendesk Integration and Haptik will allow you to provide finer customer service. Using Haptik, you can build AI-powered user journeys which help the user to resolve their queries faster.
Sunshine Conversations will be used as an aggregator in this integration. As a user, you can have Live Agent set up via different channels provided by Sunshine Conversations. There are multiple features supported by Sunshine Conversations, you can check those out here.
Zendesk and Sunshine Conversations
These conversations provide powerful asynchronous conversations which is the ideal solution to integrate with an Intelligent Virtual Assistant. Sunshine Conversations elevates the Zendesk messaging experience as it leverages different social messaging channels to increase the customer engagement of any business.
Building on the Sunshine Conversations platform comes with a wide range of benefits which include:
- Ability to deploy your bot solution across dozens of channels, including Whatsapp, Facebook Messenger, LINE, and more
- Access to a wide range of rich messaging capabilities, including rich message types, activity indicators, template messages, and robust SDKs
- Ability to programmatically manage control of the conversation using Switchboard, including escalation to a live agent in Zendesk Support
- Ability to connect all your data sources giving you a complete insight about your customers using the Zendesk Suite
- Ability to reduce costs, speed up development time, and bring your bot faster to market using our fully featured Sunshine Conversations SDKs
The following diagram visualizes how the Zendesk and Sunshine Conversation Integration works with Haptik.

Prerequisites for Haptik bot with Sunshine Conversation Integration
- A bot on Haptik. You can read this article to build your own bot on Haptik.
- A registered account on Zendesk. You can check the pricing, here.
How to Set up Haptik + Sunshine Conversations Integration?
We have laid out all the required steps for making this integration successful. For ease of understanding, we have created 6 simple goals and explained the required steps under each goal.
- Enable Sunshine Chat Connector on Haptik
- Complete OAuth process
- Configure Sunshine Switchboard
- Configure agent setup on Haptik
- Set up agents on Zendesk
- Set up Trigger to close tickets on Zendesk
So, as mentioned in the prerequisites, you would need to have a registered account on Zendesk before we get started with the steps. Apart from that, you need to have a bot on Haptik as well, post which the following steps need to be taken into consideration for this integration.
1. Enable Sunshine Conversations on Haptik
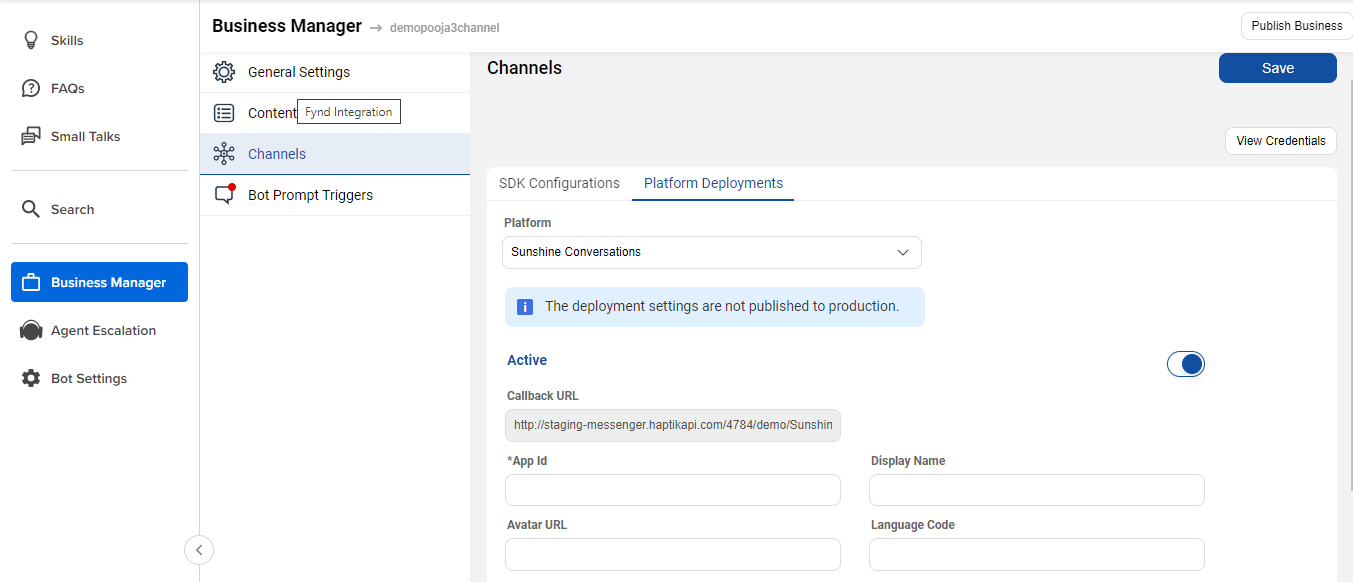
Note that the Active toggle shown above needs to be enabled. Once you have done everything here, we can move to the next stage, which is completing the OAuth process.
2. Complete OAuth Process
Now that we have enabled Sunshine Chat Connector on Haptik in the previous step, we would go ahead and connect Haptik and Sunshine Conversations in order to enable this integration. Completing the OAuth process will help in connecting these two platforms together.
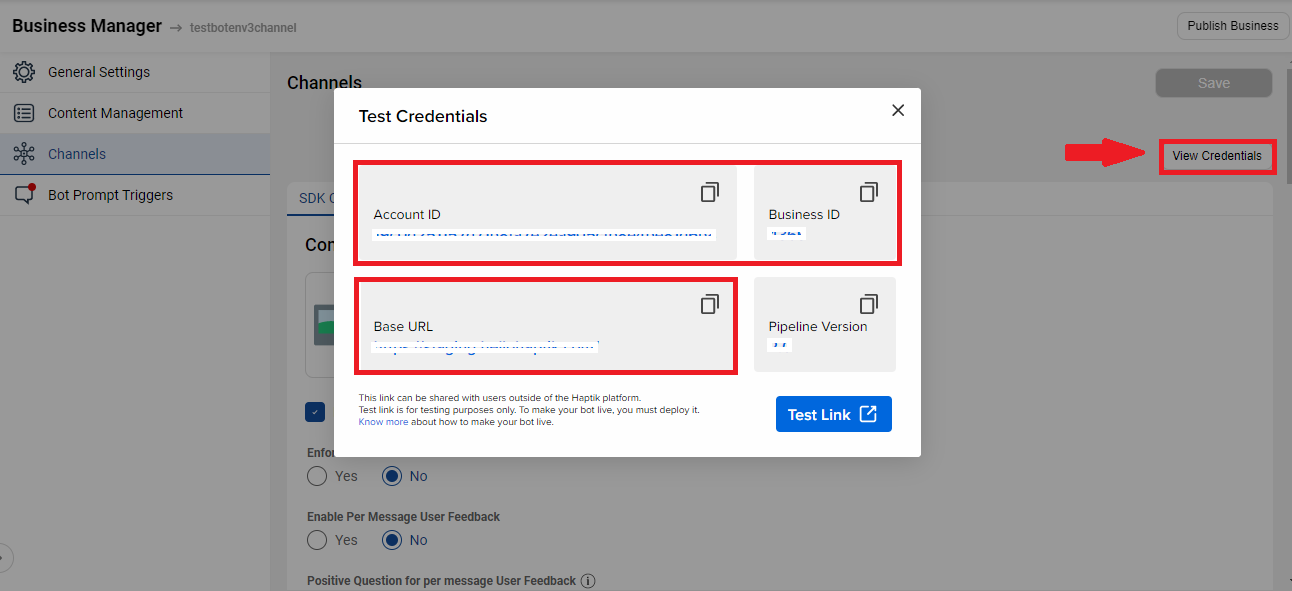
Step 1: Haptik will provide you with an authentication link that will complete the process of connecting your Haptik Bot with Sunshine Conversation. In order to generate the authentication link, you need to provide a few basic details to Haptik, such as
- Account Id
- Business Id
- Base URL
For the above three values, open your bot on Haptik, navigate to Business Manager > Channels > Platform Deployments, and select View Credentials, as shown.
Step 2: To generate an authentication link, reach out to your Haptik SPOC with a request to create the same. Your SPOC will respond back with the link. The link will be in the below format.
[MD_Base_URL]/third_party_integrations/v1/zendesk/get_auth_url/[business_id]
Step 3: Once you have received this URL from Haptik, you need to open this URL on the browser. You will land on the following page where you have to enter your Zendesk sub-domain and click on Sign in button, as shown.
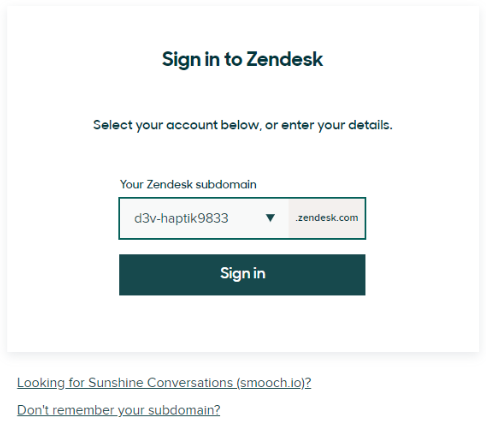
After clicking on the Sign in button, you will redirect to Allow Haptik to access your Zendesk account.
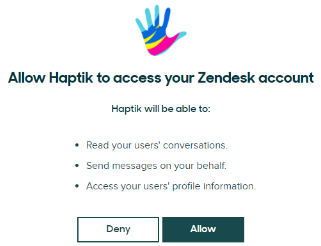
Step 4: Once you click Allow, your OAuth process will be completed. It will open up a screen as shown below.

Step 5: Now, move to your bot on Haptik, and navigate to Business Manager > Channels > Platform Deployments. Here, you will see that App Id has been auto-populated as stated above.
3. Configure Sunshine Switchboard
Whenever there is a human assistant involved, there needs to be a decision-maker who passes the control between different parties. The decision-maker will correctly route control to the widget either from a bot or a live agent. The Switchboard is the decision-maker.
Switchboard enables businesses to build a seamless integration between the chatbot solution and other Sunshine Conversations integrations, including the Zendesk Suite - enabling shared customers to take full advantage of the joint solution.
Switchboard delivers dedicated API endpoints to help your software pass, offer, and accept control of a given conversation and manage the flow of messages between users and various business systems.
Step 1: In order to configure Sunshine Switchboard, navigate to the POSTMAN application, where you will have to call the following POST API:
[MD_Base_URL]/third_party_integrations/v1/zendesk/post_default_integration/[business_id]
Step 2: Before you call the API, make sure you add the Username and Password, in the Authorization section, as shown in the image below.
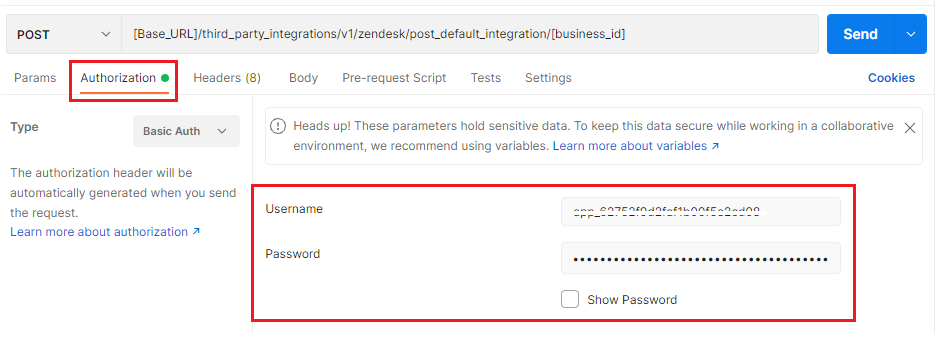
For Username and Password, navigate to your Zendesk Admin Center account and click on Conversations API Under Apps and integration. Here, you need to click on the Create API Key button, after which the Key ID and Secret Key will be generated. The key ID will be the Username, and Secret Key will be the Password.
4. Configure agent set up on Haptik
When the user requests to chat with an agent, the bot needs to transfer that chat in order to do so. You can configure the agent set up on your Haptik bot by creating a simple user journey such that it will enable this transfer of chat from the bot to an agent every time the user requests to chat with an agent.
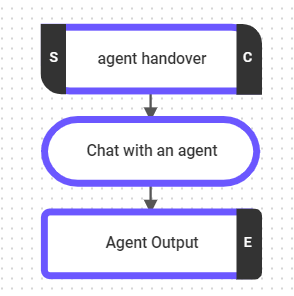
Step 1: Here, along with the user journeys you have built on your bot, you will have to create a new journey for this starting with a Static Step, and connect it to a Code Step, as shown.
In the Output Step, on Bot Response, select Raw Text/JSON and add {"is_agent_transfer": "True"}. When the bot encounters this bot response, the chat will be handed over to a live agent on Zendesk.
Step 2: Copy and paste the below code in the Code step.
import  json
import requests
import base64

def main(event, context):
    """
   event['body'] is a string dict with the following keys:
   node, event, user, entities.
   Currently, we pass user_id, user_name, full_name, device_platform and language_code in the user dictionary.
   Args:
       event (dict): Data corresponding to this event
       context
   Returns
       (dict): response with statusCode and the response for the User
   """
    body = json.loads(event['body'])
    print("body == ", body)
    environment_variables = body.get('env_variables')
    entities = body.get('entities')
    user_data = body.get('user')
    user_details = body.get('user_details', {})
    conversation_details = body.get('conversation_details')
    auth_id = user_data.get('auth_id')
    print("authId:", auth_id)
    api_response = transferToAgent(auth_id, environment_variables, user_details)
    final_response = {
        'status': True,
        'api_response': api_response,
        'conversation_details':conversation_details
    }
    print(final_response)
    response = {'statusCode': 200, 'body': json.dumps(final_response), 'headers': {'Content-Type': 'application/json'}}
    return response

def transferToAgent(auth_id, env_variables, user_details):
    print('user_details -- ', user_details)
    payload = {
        "auth_id": auth_id,
        "source": "sunshine_zendesk",
        "user_details": {
            "dataCapture.systemField.group_id": env_variables['GROUP_ID'],  # get all Group id https://<your-subdomain>.zendesk.com/api/v2/groups.json
            "dataCapture.systemField.tags": "['\''updated new trackorder'\'']", # these are not mandatory fields
            "dataCapture.systemField.status": "open",  # these are not mandatory fields
            "dataCapture.systemField.requester.name": user_details.get('name', 'Guest User'),  # system ticket field
            "dataCapture.systemField.requester.email": user_details.get('email', 'Guest email'),  # system ticket field
            # "dataCapture.ticketField.4452757109775": "gadgets - Custom Ticket"  # Product Category  # custom ticket field
            # about ticket https://support.zendesk.com/hc/en-us/articles/4408886739098-About-ticket-fields
        }
    }
    return cacheUserDetails(payload,env_variables)

def cacheUserDetails(payload, env_variables):
    url = f"https://<Base_URL>/third_party_integrations/v1/zendesk_live_chat/cache_user_details/"
    print("url:", url)

    headers = {
        'Authorization': f"Bearer {env_variables['BOT_TOKEN']}" ,
        'Content-Type': 'application/json',
        'client-id': env_variables['ACCOUNT_ID']
    }
    api_result = postStdRestfulApi(url,payload,headers)

    if api_result['error'] :
        errorObj = json.loads(api_result['message'])
        if 'errors' in errorObj and isinstance(errorObj['errors'],list) and len(errorObj['errors']) >0 and 'title' in errorObj['errors'][0] :
            api_result['message'] = errorObj['errors'][0]['title']
        return api_result
    else:
        return api_result

def postStdRestfulApi(url,payload,headers):
    print("payload data", payload)
    try:
        response = requests.request(
            "POST",
            url,
            headers=headers,
            data = json.dumps(payload),
            timeout=7
            )
        if response.status_code == 200:
            print("api response 200: ",response.text)
            result = {
                "error":False,
                "message":"ok",
                "data":json.loads(response.text)
            }
            return result
        else:
            print("API FAILED. STATUS CODE: ", response.status_code, response.text)
            result = {
                "error":True,
                "statusCode":response.status_code,
                "message":response.text
            }
            return result
    except requests.exceptions.Timeout as errt:
        print("Timeout while call ",url," ,error:", errt)
        result = {
            "error":True,
            "message":"Timeout Error"
        }
        return result
    except Exception as err:
        print("Error while call ",url," ,error:", err)
        result = {
            "error":True,
            "message":err
        }
        return result
Step 3: In the above code, you are required to add data in the following four fields.
- BOT_TOKEN
- ACCOUNT_ID
- GROUP_ID
- MD_BASE_URL
Let us understand how you can acquire each of these.
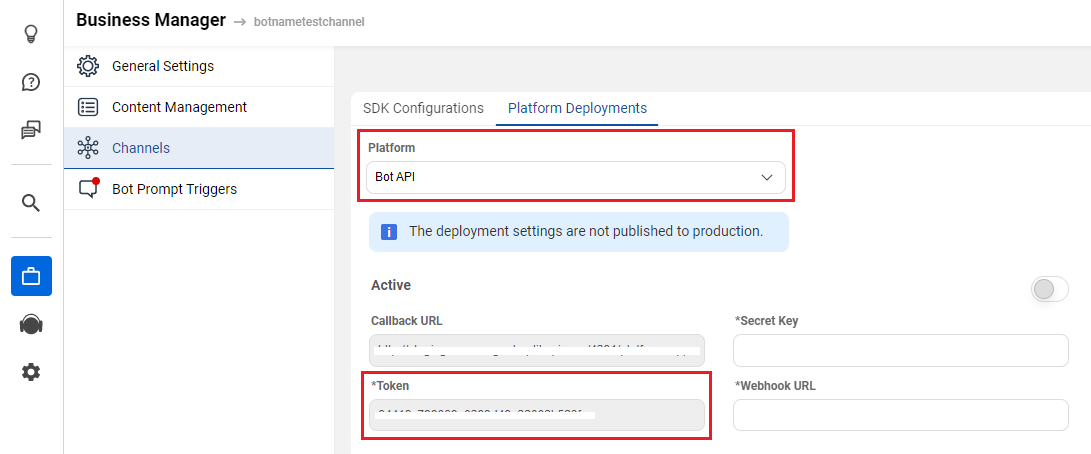
Step 4: For BOT_TOKEN, open your bot on Haptik, navigate to Business Manager > Channels > Platform Deployments, and select Bot API under Platform dropdown. Here, the Token will be auto-generated, and you have to use that as BOT_TOKEN.
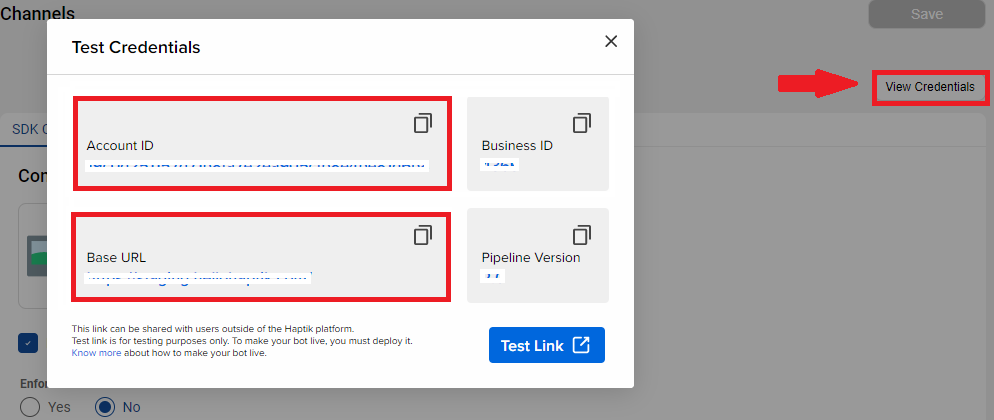
Step 5: For ACCOUNT_ID and BASE URL, move to Platform Deployments, and click on View Credentials, while you have selected Bot API under Platform dropdown, you will get these details, as shown.
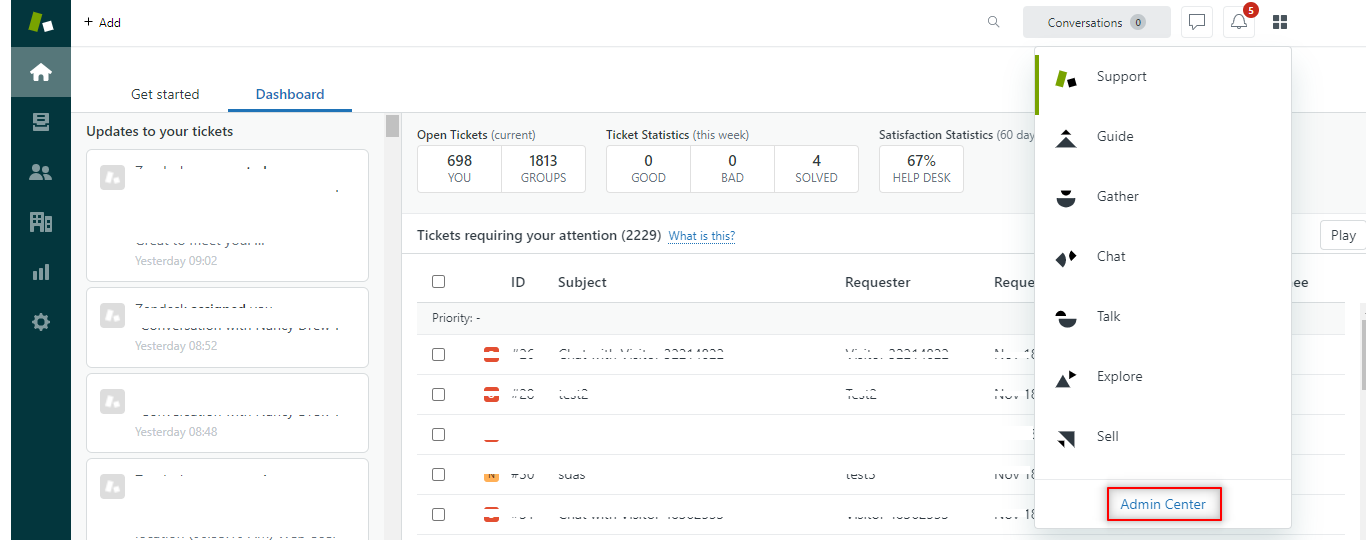
Step 6: GROUP_ID is added in order to send the user's conversation to a specific group when the user requests to Chat with an Agent in the conversation. For GROUP_ID, navigate to your Zendesk account, and select Admin Centre from Zendesk Products, as shown.
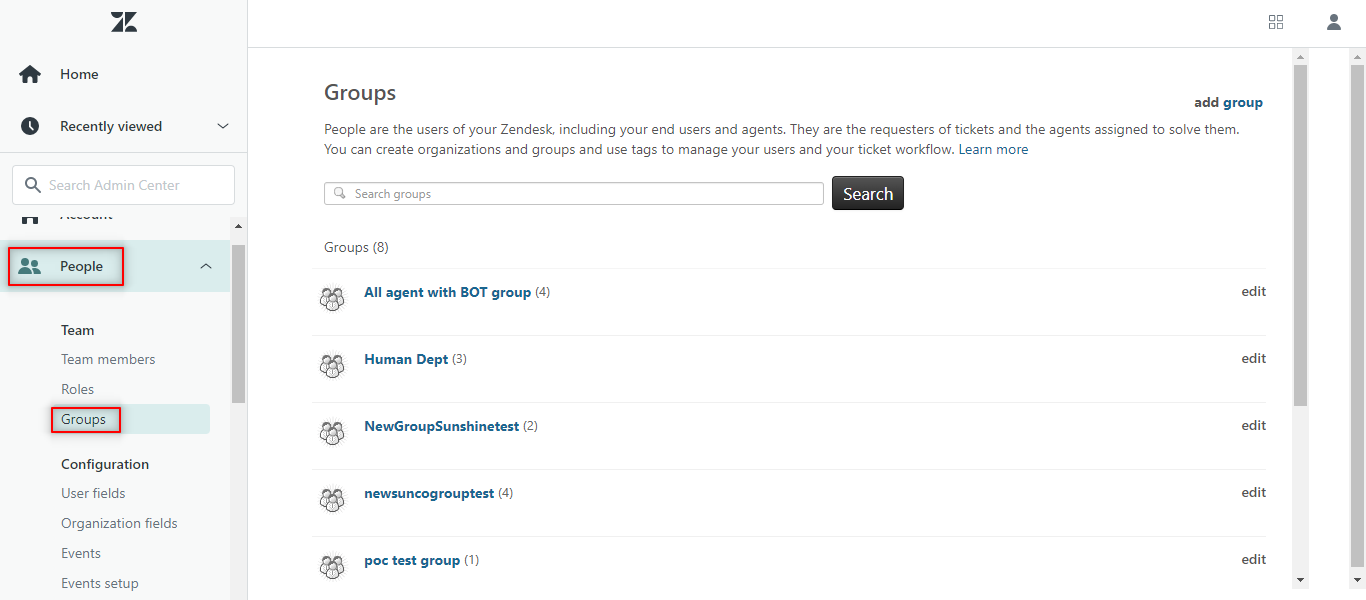
Next, navigate to People > Groups, and you will see all the groups that have been added. Additionally, you can add a group, by selecting the add group option seen in the image.
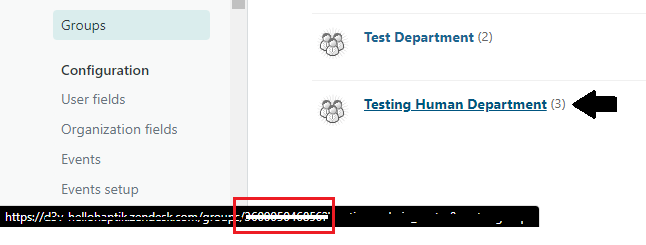
Now, hover the cursor over the group you want to add, and you will see an URL, as seen in the image. The part in the URL that is highlighted with a red rectangle is the GROUP_ID, as shown. You can either do this or call "https://<Your-Zendesk-Subdomain>.zendesk.com/api/v2/groups.json".
 If you do not add a GROUP_ID in the code, then the chat will be sent to an agent from the default group, as shown.
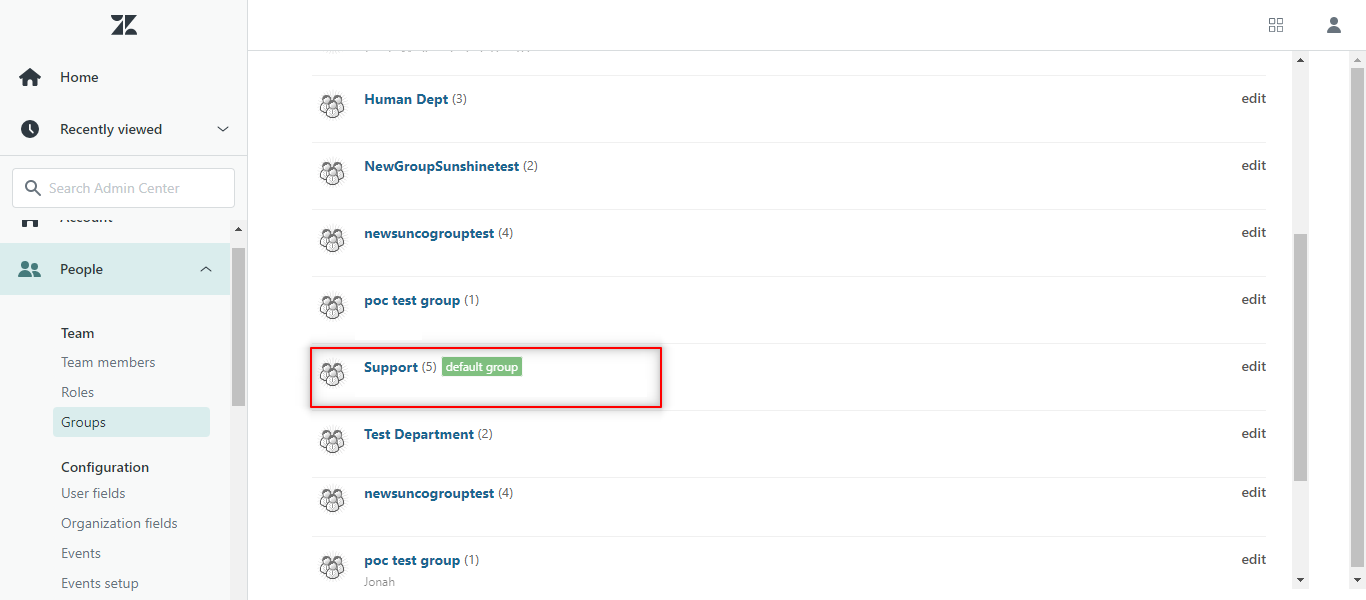
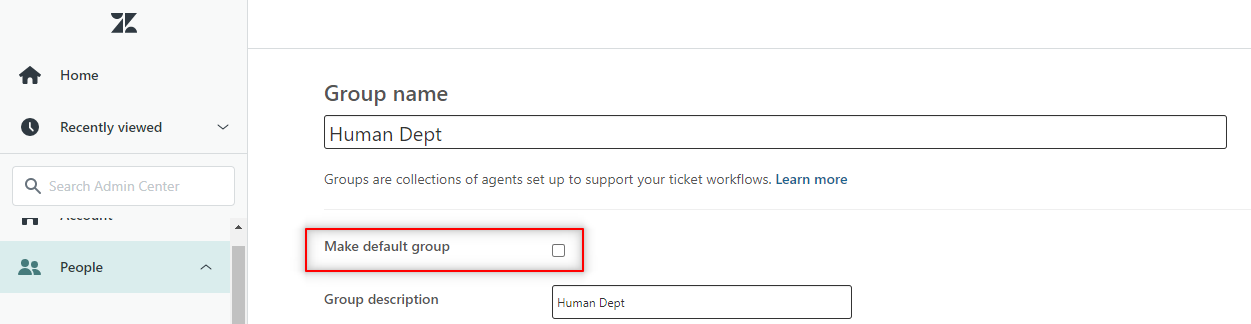
You can select any group that you want as a default one, and click on edit. You will land on the edit group page, where you can make the group a default one by checking the Make default group check box, as shown.
5. Set up agents on Zendesk
Next, you need to add agents on Zendesk, in order to facilitate the chat transfer from a bot to an agent. Unless you add agents on Zendesk, the chat won't get transferred, and the user's query will not be resolved, leading to poor feedback. Let us understand how to set up agents on Zendesk,
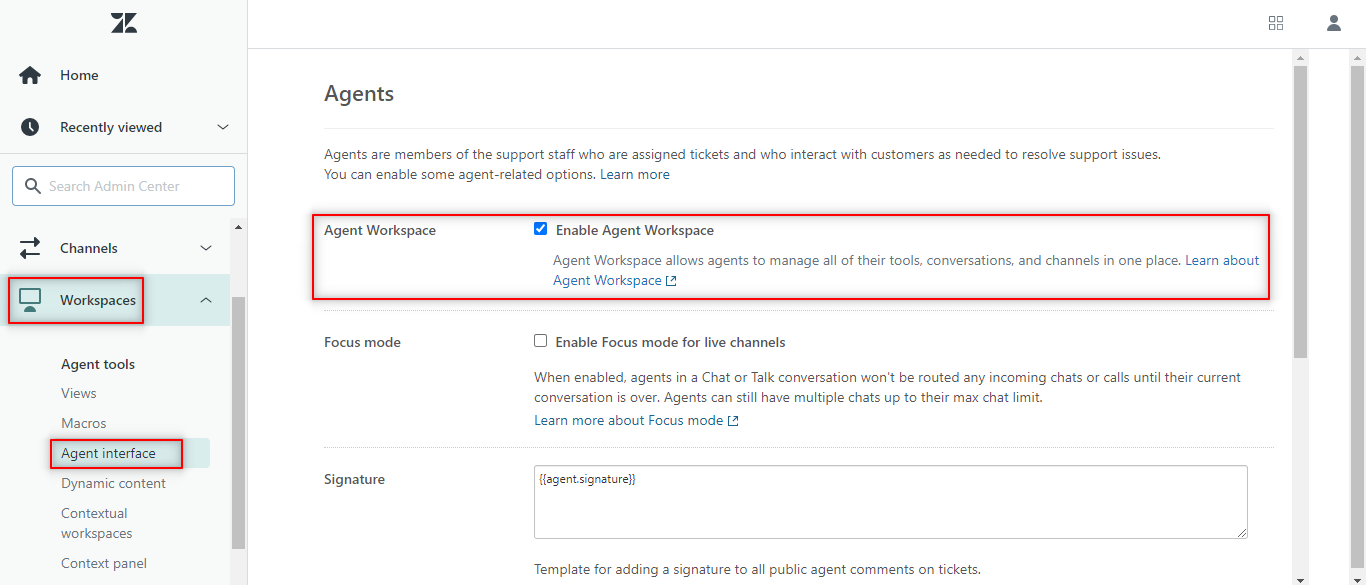
Step 1: When a user wants to connect with an agent at Zendesk, you need to enable the Agent Workspace on Zendesk first. Navigate to Admin Center > Workspaces > Agent Interface, as shown.
Step 2: In order to add Agents, you can follow these two approaches,
- Adding Agents through Zendesk dashboard.

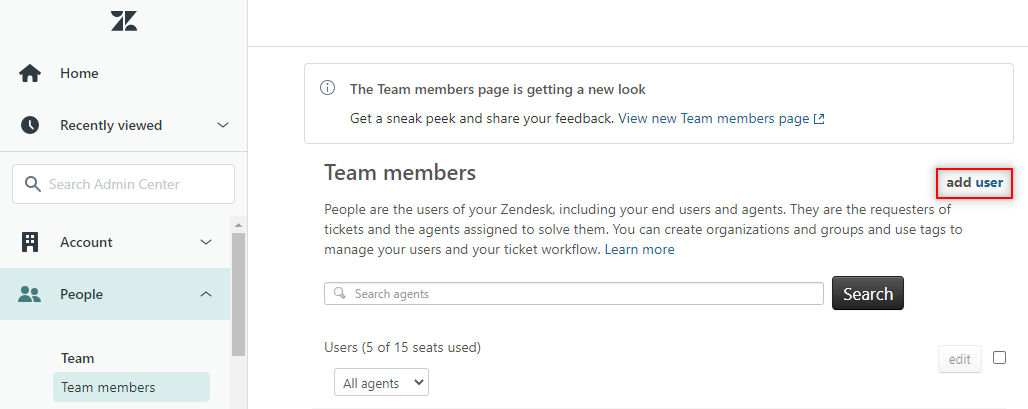
- Adding Agents from Admin Center. Navigate to People > Team members, and click on add user, as shown. Similarly, you will be able to see all the added Agents in Team members.
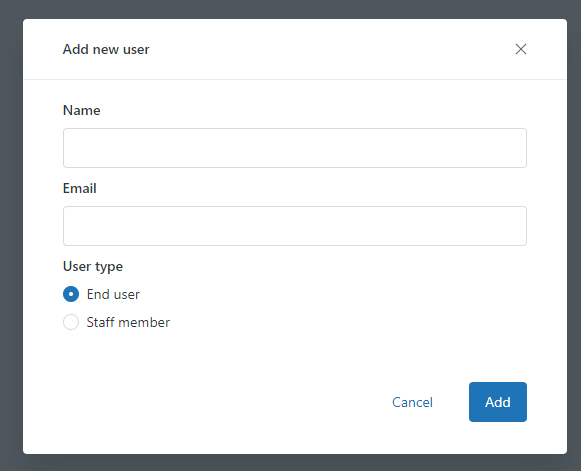
Step 3: From the above-mentioned two approaches, you will receive this pop-up, where you will have to provide a Name, Email, and Role, for your User (agent), as shown. After providing the details, an email will be sent to the newly registered user.
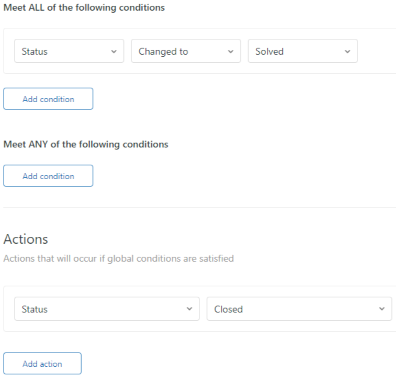
6. Set up Trigger to close tickets on Zendesk
Navigate to Zendesk Admin Center and click on Trigger under Objects and rules. Now, click on Add trigger button and enter Trigger name, Description, and Category under below conditions.
Removing SunCo Integration
To remove this integration, you need to call a post API:
[MD_Base_URL]/third_party_integrations/v1/zendesk/remove_integration/?business_id=[business_id]
For further clarity into the process, reach out to your Haptik SPOC.
