How to Use the Razorpay Lending Payments Smart Skill

Written by Soham Amburle
Updated on July 7th, 2022
- Getting Started
- Bot Building
- Smart Agent Chat
- Conversation Design
-
Developer Guides
Code Step Integration Static Step Integration Shopify Integration SETU Integration Exotel Integration CIBIL integration Freshdesk KMS Integration PayU Integration Zendesk Guide Integration Twilio Integration Razorpay Integration LeadSquared Integration USU(Unymira) Integration Helo(VivaConnect) Integration Salesforce KMS Integration Stripe Integration PayPal Integration CleverTap Integration Fynd Integration HubSpot Integration Magento Integration WooCommerce Integration Microsoft Dynamics 365 Integration
- Deployment
- External Agent Tool Setup
- Analytics & Reporting
- Notifications
- Commerce Plus
- Troubleshooting Guides
- Release Notes
Table of Contents
This Smart Skill is used by banks, money lenders, etc. for the collection of loan installments.
Name of the Skill on Conversation Studio: Razorpay Lending Smart Skill
Purpose of the Skill: This Smart Skill is designed to generate a payment link which can then be used by the user to pay their lending installments.
What’s the design template going to look like?
This Skill is designed to provide quick resolution & a seamless payment experience to the user. Please reach out to your Haptik SPOC who will connect you with the Conversation Designer to get access to the design - Lucidchart or PDF.
Requirements
- Razorpay Merchant Account. You can read more about it here.
- A bot on Haptik. You can read this article to build your own bot.
- APIs for fetching necessary information from the CRM system.
Limitations
Currently, notifications are configured only on WhatsApp and Facebook, for sending out payment acknowledgment messages to the users on the bot.
You can read more about it here.
How to use the Skill
For testing purposes, you can type an intent related to a loan installment payment.
For example, you can type ‘pay my loan installment’ to start off the flow.
How to make changes to the Skill
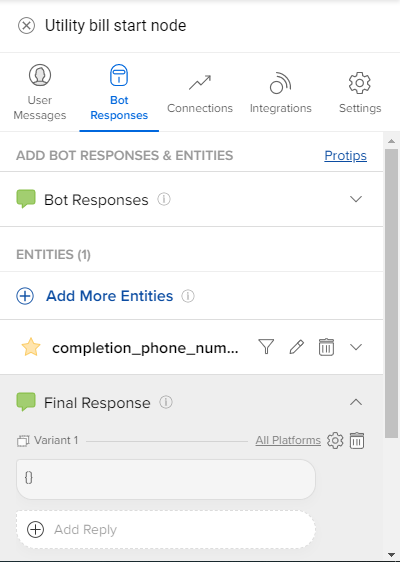
Step 1: The Start Step collects information that you would require to fetch the user's invoice records, from your system. For example, it could be a single identifier like the user’s phone number or any other identifier/s specific to the client’s CRM. You can do this via entities. The flow will start with the user receiving a prompt to enter their mobile number on WebSDK. On WhatsApp, this prompt gets skipped as the completion_phone_number entity has already been used for capturing the phone number.
Step 2: Once the phone number is captured, the flow moves to the ‘API call for fetching policies’ Code Step. The API is used for fetching the transactions pending for payment by a particular user, and the same is displayed on the bot in the form of a response.
The following are the functions being used in this Code Step:
Sr. |
Function |
Description |
1 |
def create_invoice_hsl(platform_type)
platform_type: It is an integer that indicates the type of platform on which the bot is deployed. Every platform has a dedicated integer. |
This function calls the respective HSL creation function based on the status of fetch_invoice_api(), response length of invoice list, and the platform_type i.e Whatsapp or WebSDK. |
2 |
def fetch_invoice_api() |
This function calls a CRM API that you have configured to fetch a list of invoice transactions for a particular user. It returns the response returned by API and its status (success/timeout/API error). |
3 |
def generate_error_msg(error)
error: It is a string that indicates the API status. |
In case the status of the API called in fetch_invoice_api() is timeout/failure, this function gets called and an HSL configured with the respective error message is returned. |
4 |
def no_invoice_message() |
If there are no invoices returned for the API called in fetch_invoice_api(), then this function returns a no invoice message HSL. |
5 |
def WA_multiple_invoice_message(i_data) i_data - it is a transaction list being passed from the create_invoice_hsl(platform_type) |
This function generates a WhatsApp-specific HSL for displaying multiple invoice records in a list format to the user. You can read more about it here. |
6 |
def generate_buttons(i_data) |
This function generates buttons which are then returned to the WA_multiple_invoice_message(i_data) and used as a part of the WhatsApp list HSL. |
7 |
def multiple_invoice_message(i_data) |
This function generates a WebSDK-specific HSL for displaying multiple invoice records in a carousel format to the user. You can read more about it here. |
8 |
def invoice_carousel(i_data) |
This function generates a list of carousel elements which is then returned to the invoice_carousel(i_data) and used as a part of the carousel HSL. |
9 |
def single_invoice_message(i_data) |
This function returns a reply button HSL that works on both Whatsapp and WebSDK in case there is only a single invoice. |
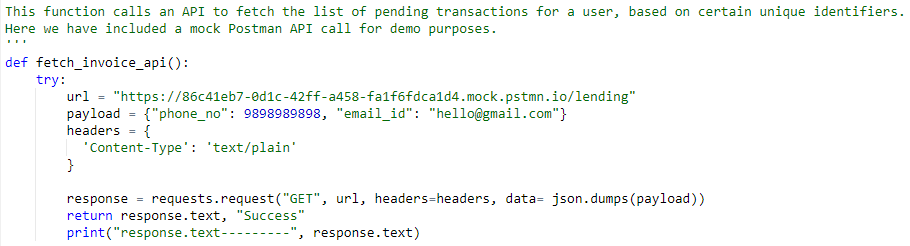
Step 3: Next, change the URL, headers, and payload under the ‘def fetch_invoice_api()’ function on the ‘API call for fetching invoices’ Code Step.
For demo purposes, we have configured a dummy mock API that you will have to replace:
Step 4: Now you can save the user details retrieved inside the conversation_details object and use them in the later stages of the flow.
Step 5: For manipulating the content shown to the user, the copy changes can be made to:
- no_invoice_message() - if no invoice is generated
- single_invoice_message(i_data) - for single invoice
- multiple_invoice_message(i_data) - for multiple invoices
Step 6: You will have to make a few changes to the ‘Payment API Integration’ Code Step on the Smart Skill and pass the user details inside the payload of the Razorpay API. The user_details can be fetched from inside the conversation_details object. The Razorpay API being used is the ‘create payment link’ of the Standard PL type. You can read more about it here.
Following is the list of functions used:
Function |
Description |
def generate_payment_link(env_variables, conversation_details) |
This function is used to call the Razorpay create payment link API, and returns the payment link as a response. |
def get_auth_token(env_variables) |
This function returns an auth_token which is a base64 encoded format of - key_id:key_secret. |
def get_unix_date(due_date) |
This function returns the unix format of the due date that is passed. |
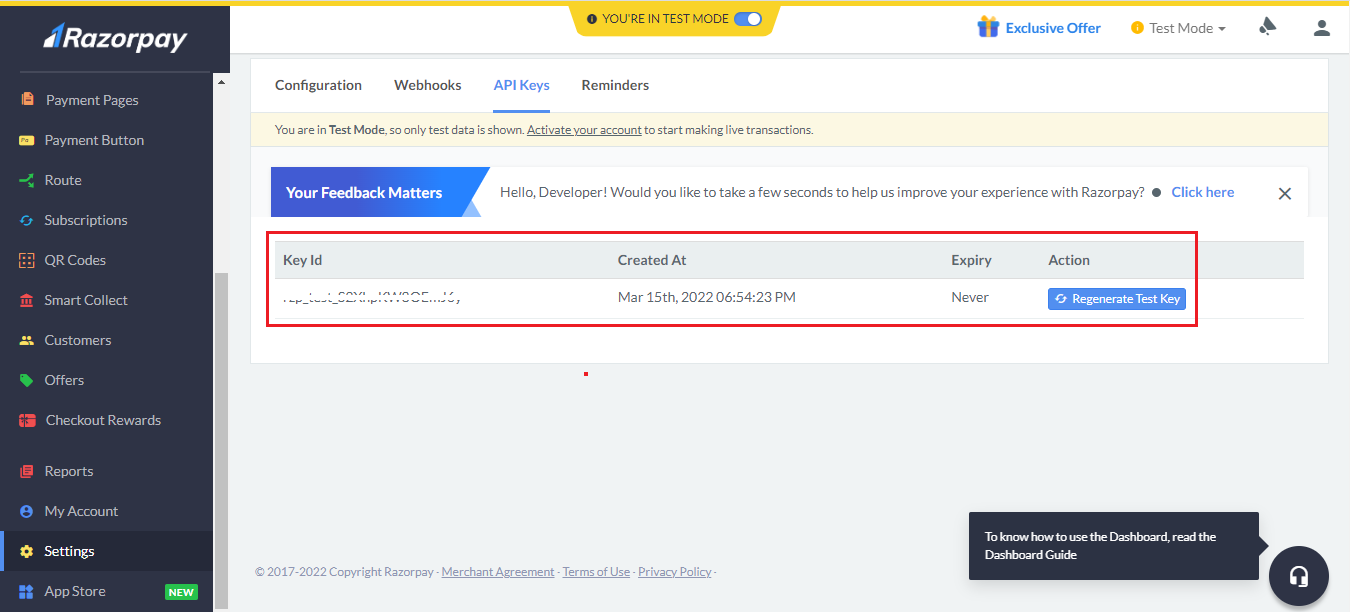
Step 7: For using the API, header parameters of key_id and key_secret are required which are merchant-specific and can be found easily on the Razorpay merchant dashboard, as shown. You can read more about it here.
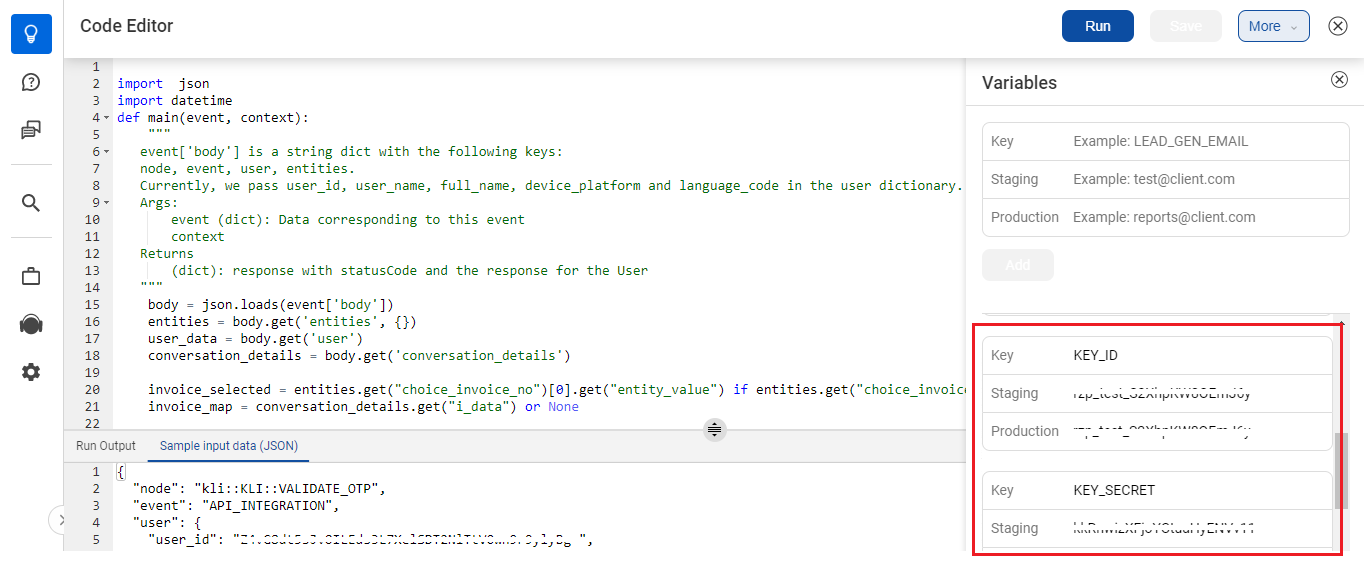
Step 8: The key_id and key_secret that you have generated need to be configured under the Environment Variables in a Code Step. Click on any Code Step and open the Code Editor. Now, select the More option on the top right corner of the screen and select Variables, as shown below.

In the variables, you need to configure the key_id and key_secret, as shown below.
In this way, you can redirect the user to a page containing the payment mode of their choice.
Apart from the above steps, you can explore a few more capabilities. Check the following Step 9 and Step 10.
Step 9: For sending out the WhatsApp notifications on payment completion to the users, you will have to create a webhook on your Razorpay dashboard. You can read more about it here.
Step 10: A WhatsApp notification trigger solution provider like Interakt can also be used to trigger the WhatsApp notifications to users on receiving the webhook events. You can read more about it here.
How to analyze your Skill post go-live
To track the usage of this Skill on your virtual assistant, you can create Smart Funnels on the Intelligent Analytics tool. You can learn more about Smart Funnels here.
Smart Funnel suggestion:
- Start point: Start lending.
-
Endpoints:
- Display single invoice.
- Display an invoice.
- Display output
